A few of us have been griping that it’s time to get a company car. Back in the old days, our 6’ 5” CEO Dave used to deliver prototypes to customers on a tiny scooter. These days, we really want to make deliveries in style… so we got a LAMBORGHINI!
Okay, not a real Lamborghini—we’re not that kind of startup.
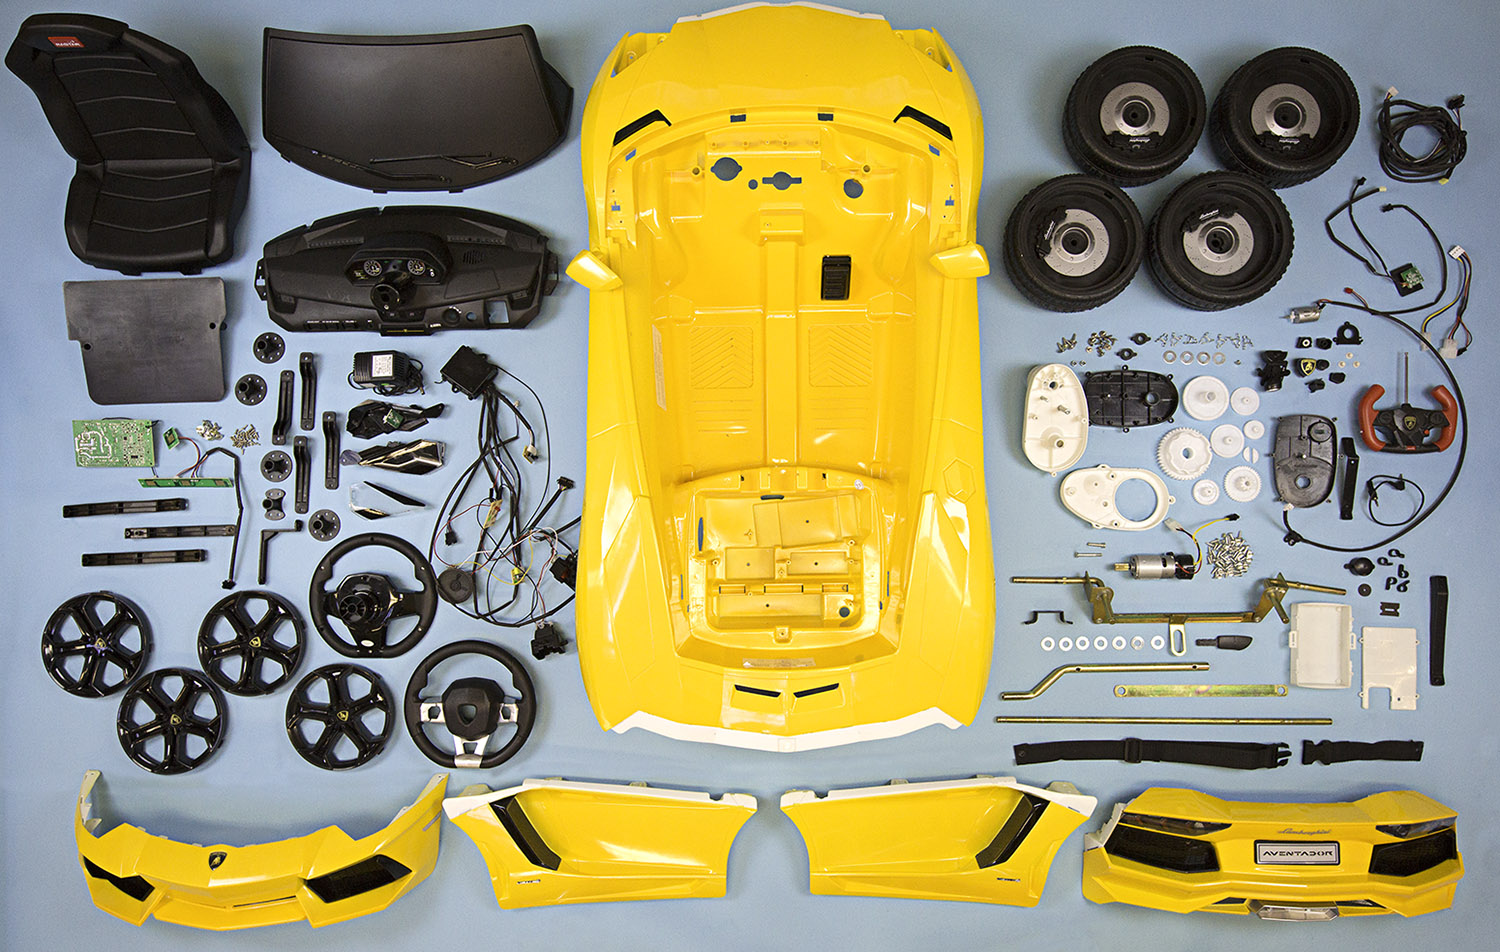
Here’s our sweet new ride; it comes in a box:
The Rastar Lamborghini Aventador costs significantly less than a real Lambo. Retailing at $270, it’s made in China and maxes out at 3mph. The manufacturer has manufacturing and distributing licenses for over 200 kinds of vehicles from world-famous vehicle brands such as Lamborghini, Ferrari, Audi, BMW, Mercedes-Benz, etc. They not only make ride-on toy cars like this one, they also make small RC cars and baby car seats. What a business!
The intended user is 3-5 years old and weighs less than 55 pounds, but we totally drove it around just fine. There are big safety factors in the specs.
Teardown time!
Looking at the car from above, there’s not a single screw to be seen. We need to get under the Aventador like a real mechanic. Luckily for us, this vehicle weighs a mere 33lb, so instead of using car lifts and a creeper, we only had to flip it onto its side.
Wheels
The first things to come off are the wheels. These are so detailed, they actually have rims! The rims have flex tabs that snap into the tires.
Steel shafts go through the center of the wheels and are held in place with spring wire retainer rings.
Underneath the body, we saw a lot of Phillips self-tapping screws. Screws hold the side panels to the main “carriage”. The front and back fenders are attached in the same way.
The car is steered by the front wheels and powered at the rear wheels, like a lot of real cars. The steering mechanism is a parallel 4-bar linkage setup and the steering rod in the middle swings one of the parallel bars from side to side, triggering the turns.
There are quite a lot of wires running between the front and back of the car, routed using common plastic clips held to the body by… you guessed it, more self-tapping screws!
Body Panels
The body panels are large injection-molded pieces of ABS plastic. ABS is known for its impact resistance and toughness, making it an ideal material for thin-walled enclosures. The body panels are molded in natural ABS resin, which is beige. The cosmetic surfaces are then spray painted yellow, white, red, or green depending on the SKU.
Spray painting is a very cost effective way to add color when the parts are large, compared to using pigmented resins. An additional benefit is that spray painting masks the texture of the tool.
You can get a variety of surface finishes with spray painting, from grippy to satin to glossy and polishing the mold that made these large panels is no easy or cheap task. So why polish it glossy when you can get that for free with paint?
Dashboard
The dashboard has quite a few bells and whistles.
There are buttons for turn signals, sliders for tuning the volume of the sound system, an audio jack for plugging in your own mp3 player or phone…. everything a very fancy 5 year old could need!
After the dashboard came out, there was an explosion of wire harnesses. You can see a pretty sizeable speaker—it’s loud, but sounds terrible.
We found some 2-position slide switches, and a slide potentiometer for volume control:
You can use a plastic key to turn on the car, and the magic behind the scenes is just a rocker switch. Genius!
The gear shifter works similarly: a clever mechanism involving a simple, ubiquitous rocker switch.
Steering Wheel
We opened up the steering wheel to find 2 PCBAs.
If you’ve been following our previous teardowns, these exposed copper pads should look familiar: this is the same kind of technology found in the Nintendo game controllers.
When an elastomer button presses down onto the PCB, it shorts the traces together. These keypad switches feel soft and endure abuse well.
Rear Components
Moving to the rear of the vehicle…
We found a single 6V, 7A battery powering the motion of the car and all the fancy add-ons, such as LED headlights and a pretty awful speaker, all located under the seat.
We really hope this battery is safer than those Hoverboard ones… or it could literally light a fire under some poor person’s a**.
Also found underneath the seat is a white plastic box, which protects the brain of the car. This is where most of the wires end up.
After undoing 4 more self-tapping screws (!) to open the white box, what we found is a bit underwhelming. But what did we expect?
This thing isn’t exactly smart, nor does it connect to the internet. It’s times like these when we’re reminded of how simple electronics used to be… ohh the good ol’ days.
After everything came off, we took a step back and admired the size of the car body. This is definitely one of the biggest molded parts we’ve come across in teardowns.
Overall, there were a lot of screws in this little car. This is the primary method of fastening everything. Snap fits are used as well.
Generous amounts of hot glue are applied to solder joints to prevent the wires from coming loose. Heat shrink are put around the wires, but they weren’t actually shrunken for some reason.
The BOM of this product is long, and the assembly process involve many steps. However, the assembly techniques are simple and low-tech. There’s plenty of room to spare in this product and the ample amount of room makes life much easier for mechanical engineers!
Now that we’ve (carefully) taken this thing apart, next we’re going to build it back up! But better.
So stay tuned and subscribe below for our upcoming series, where we’re going to build a $500 souped-up mini electric car for the Power Racing Series, Fictiv-style.