Time to read: 13 min
In a world of ever-increasing electronics, our lives are continuously impacted by devices that incorporate some sort of heat-generating circuitry. When it comes to electronics that dissipate power in the form of heat during normal operation, it is often necessary to manage this heat, to ensure the components don’t exceed their maximum allowable temperatures.
One of the most common methods to manage power dissipation is to use a heat sink. A heat sink is a substance or device that absorbs or dissipates especially unwanted heat from a process or an electronic device. Heat sinks are used on a broad range of electronics, ranging from CPUs to motor drivers.
The purpose of this article is to walk through the basics of heat sinks and heat sink design, including the calculations involved in defining the proper heat sink for any application. In the following example of proper heat sink design, the common L298 (multiwatt15) full-bridge driver chip will be utilized, as it produces a significant amount of heat when operating at the upper limit of its range.
Download our heat sink calculator to accurately define heat sink requirements
What are Heat Sinks?
A passive heat sink is a mechanical component that is attached to an electrical component for the sake of transferring heat from the electrical component into the surrounding environment. This environment is most commonly air, but it can also be other fluids, such as water or coolant. The thermal conductivity of air is low, so electrical components need this extra cooling assistance, through these mechanical heat sink designs. Heat sinks are typically made of CNC machined aluminum or copper and have heat sink fins or pins that work to increase the surface area of the component, to facilitate the heat transfer to the surrounding fluid. The image below demonstrates two mechanical heat sink types: a pin (left) and a fin (right) type of heat sink.
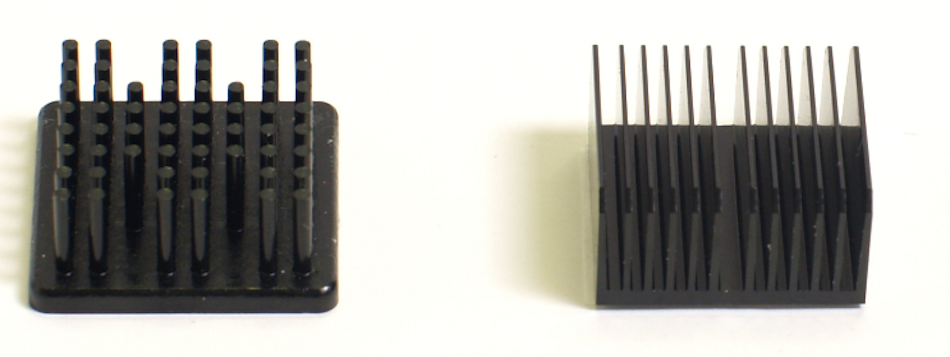
As we can see, these two heat sink types have a much greater surface area than the flat heat sink with the same width and length. The metals of which heat sinks are made also have a much higher coefficient of thermal conductivity than the plastic packaging of typical electrical components. Most mechanical heat sinks are made of aluminum alloys, due to these alloys being cheaper than copper, which has a higher thermal conductivity. For this reason, copper heat sinks, the best metal heat sink material for thermal conductivity, are only selected when the unit must operate at much higher environmental temperatures, making the material worth the cost.
Free Tool: Heat Sink Calculator
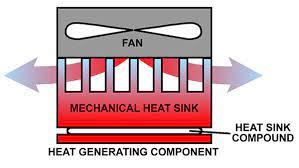
Heat sink compounds are thermal pastes that are used to fill air voids in heat sink construction. These voids are typically found in the space between the surface area of the heat sink fins and the CPU heat source. These thermal paste CPU heat sink compounds fill in these gaps to help keep the processor temperature low by maintaining thermal CPU heat sink surface contact. Heat sink compounds can be made from copper, zinc oxide, aluminum, silicon oil, ceramic, or graphite. Due to their application, seeing constant high temperatures and their operating temperature ranges being lower than mechanical heat sinks, these heat sink compounds must be reapplied according to their suggested shelf-life.
This article will walk through the math behind heat sinks, using a real-world example. For further technical background, review the data sheet for the L298 Dual Full-Bridge Driver.
Establishing the Need for a Heat Sink
Electronics tend to generate heat because the electricity-conducting components within them are not 100% efficient. The heat must be dissipated as most electronic components cannot withstand the excess generated heat. For example, circuits have a maximum operating temperature that is typically referred to as the maximum junction operating temperature (T op). The L298 specifies this as 130°C in the datasheet. If the L298 is exposed to temperatures above this maximum junction operating temperature due to the heat generated by surrounding components, some damage is likely to occur.
The component itself will also generate heat during standard operation. The component is not force cooled by means of a fan; it will operate in an environment with a given ambient temperature. The amount of heat that will be generated during normal operation should first be quantified, as well as how this will impact the operating temperature in the ambient surroundings.
The formula below defines the maximum amount of power (or energy via heat transfer) that can be dissipated, given a few known variables:

Where:

The ambient temperature is room temperature for open electronics that are indoors but may be higher for projects that are enclosed with other heat-generating devices. It will be even higher than that if a heat-generating device is located outside, in the hot summer sun.
The thermal resistance is a value that defines the amount of temperature rise per watt of power dissipation within the component. If we look in the datasheet for the L298, we can see that the thermal resistance from the junction to ambient is 35 ˚C/W. That means that for each watt of energy dissipated, the chip will raise in temperature by 35 degrees.
Plugging these values into the formula above gives:

Since the chip is rated 2A per channel, with an input voltage of 46V, the total power input is 92 watts (P=I*V). The total power input is not all lost to heat generation. This calculation will be covered additionally, but it is safe to say that the heat generated will be more than 3.06W to get anywhere near the maximum current rating.
Calculations to Size a Heat Sink, L298 Max Power
For this example, the component will first be characterized and then the heat sink will be selected.
Power Dissipated in the IC
The power that is dissipated in the component won’t be the full operating load, but the full operating load can be determined by looking through the data sheet. From the screenshot below, the L298 will have a voltage drop of 4.9 V at the max continuous current of 2A and a drop of 3.2V at 1A.
This is equal to 9.8 watts at the max continuous current and 3.2 watts at 1A. The PC chip will overheat if running 1A in room temperature surroundings because this is greater than the maximum amount of energy which can be dissipated by the chip alone. This establishes the need for a PC heat sink, even at 1A continuous.
Thermal Resistance
Previously, thermal resistance was mentioned in an equation. Thermal resistance is a variable used to describe the relative resistance of heat transfer that is present in a component package. For the initial example, 35C/W was utilized as the thermal resistance because this is what the data sheet specifies for the component. However, there is more to thermal resistance than just this data sheet value. Looking at the data sheet excerpt below, there is also a value for thermal resistance from the junction to the case.
This describes how heat is transferred from the junction to the case but neglects the heat transfer from the case to the ambient surroundings. That’s where the next variable (Rth j-amb) comes into play. However, if a heat sink and thermal heat sink compound are utilized, the heat transfer to the surrounding air can be improved. The heat transfer to the surrounding air can also be further improved via forced air cooling such as a heatsink fan. For the design to work, the system of thermal resistances that need to be lower than the total resistance of the original component to ambient (35 C/W).
The image below (not an L298) illustrates the different sources of thermal resistance with a heat sink assembly.
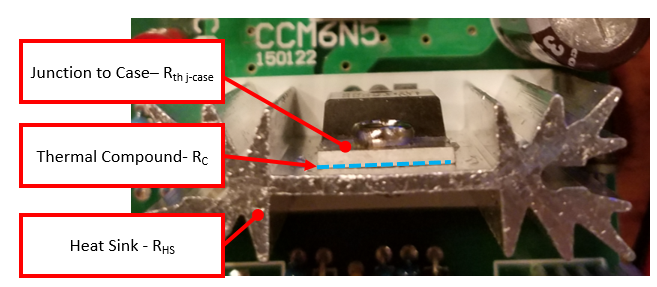
The heat transfer process is through a few different materials; the heat will have to transfer through the case, the thermal heat sink compound, or adhesive (indicated by the blue dashed line) and then through the mechanical heat sink to the air. It is important to note that for the purposes of this article, the term “thermal compound” is utilized to represent any thermal interface heat sink compound material, such as paste, grease adhesive, or pad. Since there are multiple resistances, the total thermal resistance of the system will be the sum of all three sources. The equation below is utilized to determine our new thermal resistance:

Taking into consideration how thermal resistance impacts the design, the required thermal resistance needs to be calculated for the load case to determine which heat sink will work, or if one even exists.
Calculating the Required Thermal Resistance to Accommodate Power Dissipation
Recalling the first equation, the max power dissipation was determined. This equation can be rearranged to determine the required thermal resistance for a known power dissipation, as shown below.
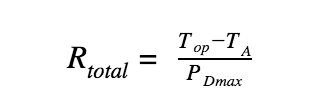
Using this equation for the 1A current draw, 33.4 ˚C/W is needed, and for a 2A current draw, an even higher thermal resistance of 10.9 ˚C/W is needed. Tis resistance will be driven by a system of three components.
Selecting the Heat Sink and Heat Sink Compound
Of the three resistances, only the last two may be controlled (thermal resistance of the case and the heat sink compound) because the component’s thermal resistance is defined by the manufacturer. The combined thermal resistance of the heat sink and the thermal heat sink compound are represented as shown below for both 1A and 2A applications:

The next step is to review options for both thermal heat sink compounds and heat sinks. The table below details a few thermal heat sink compounds and their respective resistance, based on information from Wakefield Thermal Solutions.
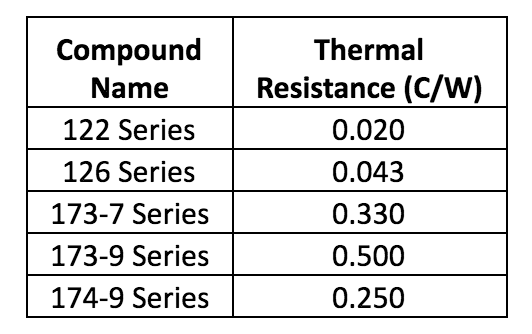
While the lower thermal resistance is given by the 122 Series compound, but they are all at or below 0.5 C/W, so the 173-9 Series will be chosen as a worst-case scenario. Next, this thermal resistance value can be subtracted from the combined thermal resistances above to determine the proper thermal resistance for a heat sink. This is shown numerically below:

While this is a great start, and it provides confidence in the chosen setup for the thermal management solution, it’s important to test this configuration. This can be done by running the part at the max intended loading and monitoring the temperature, to determine if it is in line with the expectation.
Additional Factors that Impact Heat Sink Performance
Maybe the temperatures aren’t as low as desired for the component, even if the heat sink computer design calculations were accurately performed. There are other ways of bringing the temperature down that work in conjunction with the heat sink.
Some of the key definitions to remember when designing a heat sink are:
- Thermal Heat Sink Compound Conditions – The goal is to not only have a well-rated thermal heat sink compound, but also want to ensure it is only as thick as it needs to be to fill the gap between the component and heat sink. If the gap is too thick, it may slow heat transfer.
- Natural and Forced Convection – Since a heat sink works by dispersing heat to the surrounding air, the process can be improved by moving that free air into forced convection air parallel to the heat sink fins by the use of a heatsink fan. Using forced air convection significantly increases the rate of heat transfer. This forced convection will lower the effective thermal resistance of the heat sink, while ensuring that the ambient air remains at a lower temperature. On that same note, if the heat sink is packaged in a very small package with restricted air flow, natural convection is hampered and may reduce the effectiveness of the heat sink.
Main Takeaways
Selecting the proper heat sink type and heat sink material are important factors in ensuring the reliable operation of the design. The formulas and examples in this article should provide a starting point for improving the thermal management of the designed product. Be sure to download our free Heat Sink Calculator to apply these skills and even read more about heat and design transfer and fluid dynamics.
- The most efficient heat sink design from a geometrical standpoint is one that contains fins or pins to increase the surface area for heat transfer.
- Copper is one of the best materials to choose for heat sinks as it has a high thermal conductivity. But aluminum is most commonly used due to it’s lower cost and relatively high thermal conductivity.
- A heat sink design can be improved by adding fans or pins, choosing an alternative material, or adding in forced cooling via convection.
- A heat sink works by absorbing thermal energy in the surrounding environment from electrical component inefficiency via the conduction method of heat transfer.
- A powered fan works to allow a higher flow rate of air over a surface, thereby increasing the rate of heat transfer over the surface, drawing more heat energy away from the surface.


