Time to read: 5 min
Countersink holes and countersink compatible fasteners are used in all sorts of products and projects. From cellphones and computers to industrial equipment and cabinets, countersinking is used for machining metal stock, wood, sheet-metal, and even PCBs. Engineers and designers need to know what a countersink hole is and how it can be used (compatible fasteners and other uses) to determine if it is the best choice for the project.
In this article we’ll define countersink holes, when to use a countersink, and describe how to use ANSI common standards to properly call out a countersink hole for manufacturing.
What is a Countersink?
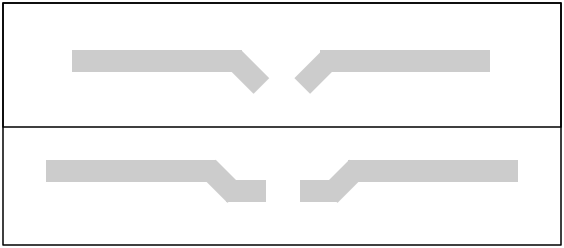
A countersink is a conical hole (cut) or conical depression (form) created in a material around a hole. The ‘conical’ element differentiates a countersink from a counterbore, which has a flat bottom. Below are visuals of countersinking and counterboring in cutting and forming applications.
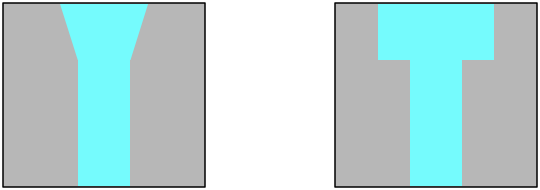
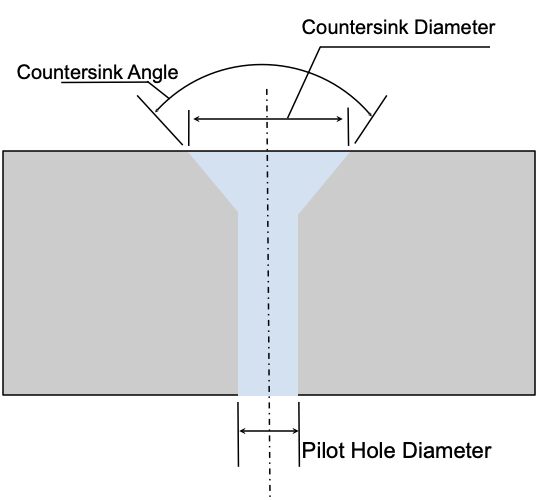
The graphic above shows how to fully define a countersink — the 3 dimensions needed to properly define a countersink are:
- Countersink diameter (this should be larger than the diameter of the screw head)
- Countersink angle (this is a standard per the type of fastener that is being used, more on this below)
- Pilot hole diameter (this is defined by shank width, type of fit, and desired clearance)
You can use a drill bit or a deburring tool as a countersinking tool if it’s within your tolerances for manufacturing. When machining, a countersinking tool is used whether it is for a screw or a rivet to keep your fasteners flush.
When to Use a Countersink
In general, a countersink is used with a flathead screw with a conical profile leading to the shank. In the below image, the screw on the left can be used with a countersink whereas the screw on the right needs a counterbore or standard hole.
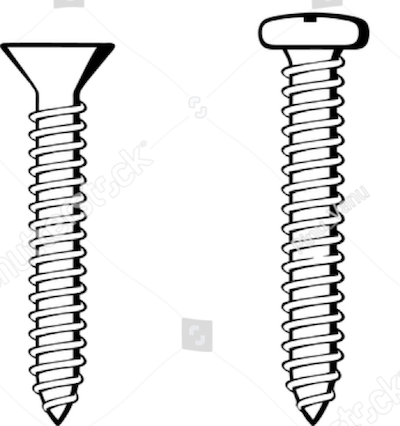
Knowing the difference between a countersink and a counterbore helps to define when it’s best to use one or the other. For example, you would never use a washer with a countersink unless it’s a rubber-like washer and you need a specialized fitting. Countersinks are used for many different reasons such as clearance requirements between moving elements, required minimizing of the vertical stackup, and cosmetic requirements.
When a fastener is countersunk properly it sits flush or sub-flush with the surface. If you take a look at a milling machine, lathe, or even a laptop, you’ll find countersunk fasteners that sit flush with the surface. For unshrouded moving elements that run closely to other objects or could be near clothing or hands, it is best to countersink the hole. A screwhead which sits proud off a surface could damage equipment or people.
Cosmetically, it’s preferable to have a fastener which blends with the surface that it’s binding. Countersinking is often used in woodworking where a properly countersunk screw can be covered with putty and stained over, yielding a seamlessly constructed and uniform finish.
Ease of assembly is another reason to use counterinks in a design. It’s much easier to put a fastener into a flared hole than a straight one, and a countersink offers a lead-in that’s easy to see and use.
For example, let’s say you need to locate a sheetmetal part onto another part such as a block of metal. If the sheet metal part has countersinks formed into it and the metal part has countersinks cut in to accommodate for the stack-up of materials, then the countersink profiles in the sheetmetal can be used to locate the sheet metal onto the main part by putting the formed countersinks into the cut countersinks. This approach can be used to remove jigs from the assembly process and injects a high degree of repeatability into the assemblies — your manufacturing team will thank you.
Defining the Countersink: ANSI or ISO
Most CAD programs, such as SolidWorks, have a built-in feature for creating countersinks in your model. Using this built-in functionality makes the addition of specific manufacturing callouts simple and easy. But it’s important to understand the underlying principle and standards, such as ANSI or ISO, so that control drawings are properly defined and manufacturing troubleshooting can be effective.
Thankfully, fasteners and their holes are very well defined by standards. You can explicitly define the countersink feature as demonstrated in the graphic above by brute force (angle, diameter, and pilot diameter). The procedure for defining a countersink for manufacturing and corresponding fastener is straightforward.
Answering three questions will ensure that you properly define the countersink diameter, countersink angle, and pilot hole diameter:
- Which standard controls the design? (ANSI or ISO)
- What is the size of the fastener?
- What type of fit/clearance do you need for your fastener?
Remember that the angle of the chamfer (countersink angle) on a countersink is different for ANSI and ISO and is matched by the fastener. You’ll likely never encounter an issue with this difference if you let your CAD tools do this work for you, but specs can change. It’s critical to properly call-out the countersink using the expected drawing elements.
Calling out a countersink in a drawing requires the 3 dimensions to be called out along with the appropriate GD&T symbols. The symbol for a countersink is “V”, and here’s an example call-out from a control drawing.
Ø 0.25
V 0.5 ±0.005 х 90॰
The above calls out a 0.25DIA pilot hole diameter, 0.5DIA countersink diameter with a bilateral tolerance of 0.005, and a 90 DEG countersink angle
Now, let’s solve an ANSI based problem — we’ll use a table to determine how to properly make the call out.
The Problem: You need to work within ANSI/imperial for your fasteners and hole sizes because your machine shop only has imperial tooling. Your screw has a #6 thread and needs a running (loose) fit to function properly. Your shop can guarantee a tolerance of 5 thousandths, either way.
What would the callout on the drawing be?
The Solution: The fastener size, clearance, and standard have all been defined, and referencing the example table below yields the parameters needed in the callout.
| Fastener Size (Thread) | Pilot Hole Diameter (Close Fit) | Pilot Hole Diameter (Normal Fit) | Pilot Hole Diameter (Loose Fit) | Countersink Diameter | Countersink Angle |
| #0 | 1/15 | 6/79 | 3/32 | 5/32 | 82 |
| #1 | 3/37 | 4/45 | 8/77 | 3/16 | 82 |
| #2 | 3/32 | 7/69 | 7/62 | 7/32 | 82 |
| #3 | 5/47 | 8/69 | 9/70 | 1/4 | 82 |
| #4 | 3/25 | 9/70 | 14/97 | 9/32 | 82 |
| #5 | 9/64 | 5/32 | 11/64 | 5/16 | 82 |
| #6 | 2/13 | 10/59 | 5/27 | 11/32 | 82 |
| #8 | 9/50 | 10/51 | 13/61 | 3/8 | 82 |
| #10 | 15/73 | 21/95 | 5/21 | 7/16 | 82 |
Using the above table, given #6 fastener with a loose fit, we have:
- Pilot Hole Diameter = 5/27
- Countersink Diameter = 11/32
- Countersink Angle = 82॰
That, along with the stated tolerance, gives a solution for the callout:
Ø 5/27
V 11/32 ±0.005 х 82॰
Now we have a fully defined countersink ready for manufacturing.
Still Feeling (Counter)sunk?
It’s always a good idea to get a second set of eyes on your designs, especially the eyes of an applications specialist, and Fictiv has you covered. Our manufacturing network has experts in injection molding, CNC machining, 3D printing, and urethane casting, and they’ll help you dial in your designs and properly call out features like countersunk holes.
Create an account and upload your design today to see what Fictiv’s instant quote process, design for manufacturability feedback, and intelligent platform can do for you.


