Time to read: 7 min
Engineering is sometimes like playing a game of whack-a-mole. Sometimes you get caught up, but there’s always that one mole that comes out of nowhere, jumps up, and smacks you across the face with its furry paw. Let’s talk about the things you should think about while designing your product, before it ever hits the factory floor, so you can skip needless iteration and focus on getting to production.
1. Prepare your assembly plan
Let’s say you want to have your product assembled at Happy Sunshine Manufacturing Ltd. in China (a fictional factory, in this example). In order to serve you the best and give you the most accurate quote, they will probably ask for design files and some basic information about the form and function of your product. Included in that package of information should be a step-by-step outline of how your product goes from a bunch of plastic parts, screws, and printed circuit boards to a fully assembled product, ready to be sent out to customers.
Based on the aforementioned information, Happy Sunshine will create a quote for you on how much time they think it will take to assemble your product and an accompanying “cost of goods sold” quote. Cost of goods sold is one of the most significant numbers for any hardware business to be aware of. Without this estimate, it’s tough to have conversations with retailers because your profit margin beforehand is unknown. In other words, it’s hard to negotiate when you don’t know what you’re negotiating for!
2. Test Early in the Process

If your product is complex and is made up of multiple different types of materials and different processes, testing becomes a big deal. I can’t emphasize this enough: Test as early in your assembly process as possible.
This not only applies to printed circuit boards, but to mechanical components, as well. Here’s another example involving Happy Sunshine:
You consign some flex sub-assemblies to Happy Sunshine from another factory. It also happens to be one of the most important pieces in your product assembly. The flex circuit is somewhat intricate and could be easily damaged.
What neither you nor Happy Sunshine realized is that the flexes were not handled correctly before their arrival, causing cracked traces, due to the mishandling. If not checked, the bad flex assemblies could potentially be attached and sealed inside the product before their functionality is ever tested.
Now you’re in a pickle. What are you going to do with this 99% assembled product? What if some of your assembly steps require an irreversible process? Sounds like that unit is going into the scrap heap, right?
This can all be avoided by testing single components or assemblies as part of a standard incoming quality control process, before they get integrated into the full product. It turns out, in this case, a functional tester was sufficient to test these sub-assemblies before the manufacturer improved their process! In many cases, the responsibility would be on the vendor to fix the problem and pay reparations, especially if out of specification, but it doesn’t always work out that way.
3. Optimize Circuit Boards
Speaking of circuit boards, here are a few considerations to keep in mind while engineering your circuit boards, to ensure that they are factory test friendly.
Single side test points
Single sided test points make your testing infrastructure easier to build. If your PCB has test points that are on both sides of the design, it will often require a clamshell tester design, which is significantly more expensive and complicated to make than a single-sided design. Additionally, the side where the test points are should also ideally be the same side where you can continue to access the test points, so you have the ability to continue testing even when the product is partially assembled.
When designing your boards, every test point on your board should be gold plated and should not have solder paste applied to it during the stenciling process. This will lead to problems with the test probes and cause false failures down the road, likely due to solder flux residue.
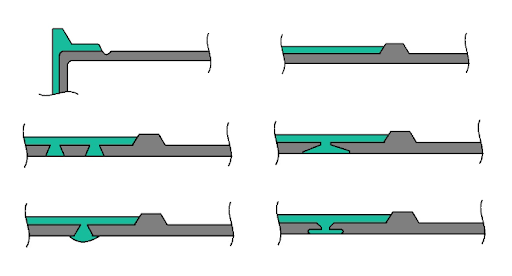
Panelize for Throughput

Here is a typical panel design you may see. The boards are held on by rat bites, and there are 4 through holes at the edges of the panels to register in the fixture. As you can see, there are no test points on the top of this board. The only exposed copper are the fiducials.
Optimize as early in the process, and then move on to the other low-hanging fruit before re-defining a process or even re-tooling. One way to do that is to assemble your main logic board several times over on one large printed circuit board. This is known as panelizing.
The main advantage of panelizing is that you can test and program units all at the same time. Another non- ideal option is to de-panelize each board and test separately, but this effectively batches testing time, creating a 6x or even 12x unit speed-up every time a test is executed.
Let’s do a quick back-of-the-napkin calculation to see the benefits here:
Time to test: 40 seconds
Time to place in tester: 10 seconds
Time to remove from tester: 10 seconds
So,
40+10+10 = 60 seconds per single unit
Let’s say your factory rate is $10 an hour, and you want to test 60 units. Your cost per unit is $10/60 = $0.16 per unit single up (yikes!)
Now, let’s panelize it.
We already know it takes 60 seconds to test, no matter what, and the factory rate remains unchanged. In this case, though, we have multiplied our testing rate by 6x (6 boards per panel), so our calculation looks more like this:
$10/(606) = *$0.027 per unit panelized (much better!)
4. Find the Bottlenecks
When creating an assembly plan, unless you have done a certain process before, you may be unsure how long the procedure will take. Sometimes that leads to a scary realization that your original time estimates were way off.
Let’s return to our Happy Sunshine example:
During your pilot runs at Happy Sunshine, they realize that bonding two circuit boards together is taking significantly more time than expected. This process requires specialized and expensive equipment, so it’s unfortunately out of your control to improve immediately. Happy Sunshine recommends the following, in this case:
- More shifts: Place a person on that machine for more hours in the day, increasing throughput. Sometimes this requires overtime, which adds to the overall COGS (no good!)
- Breaking down the process into smaller steps, if possible: Sometimes it makes sense to batch a certain part of the process and then go back and batch the final part.
Neither of these solutions are ideal and probably still make your hair stand on end. So what now?
Redesign your product to remove or lessen the impact of this part of the process all together.
Queue the steam coming out of your ears.
One of the main ways to steer the ship clear of this iceberg is to determine the test time or assembly time information for your production equipment beforehand. This way, you can add that as a note in your assembly plan and even approximately calculate assembly time in an excel document, just as you would calculate the price of a bill of materials.
5. Use Functional Testers

Functional testers are at the core of figuring out along the assembly process whether or not you have a working product. I have seen processes using LabView, custom, and complex test fixtures, while in other cases, I’ve seen the most basic, bare bones test fixture, with a sketchy Chinese multimeter attached. The biggest takeaway from both ends of the spectrum is to avoid reinventing the wheel.
For instance, why is it necessary to design, fabricate, and assemble your own test PCB, when you can more easily purchase a Raspberry Pi or a Trinket Pro and install it into your fixture? They are pre-tested, well-used, and typically easy to program.
There are times, though, when using industry standard test equipment cannot be avoided. There are even some cases in which they may actually be recommended. For instance, if I wanted to measure a resistance or even a voltage on a device under test, I could:
- Build a custom PCB, firmware, etc., to measure the voltage, current, or resistance accurately
- Alternatively, I could use something like a HP/Agilent 33401A (the latest version is the 34465) to accomplish the same thing with greater accuracy.
- Or, as another alternative, have someone design the tester for you.
Test equipment exists for a reason, and sometimes it just makes sense to buy a used multimeter on eBay, rather than investing your time, energy, and cash in another unnecessary mini-project.
When searching for equipment, look for ones that allow you to send commands over GPIB, USB, and Ethernet. That way, you can utilize common Python libraries, such as PyVISA and PySerial to implement your test infrastructure.
Conclusion
Bringing a product to production can be fraught with peril, but when you take the time to sit down, develop a plan, and gather as much information as possible beforehand, you can avoid 80% of your production problems before they begin.
Optimizing test placement, testing as early as possible, and avoiding the unnecessary creation of tools that already exist are strategies that add up to save you some of the design, testing, and time that is necessary to get your product out the door.
Moral of the story? Don’t forget to look forward and design for production. Everyone on your team will thank you later.