

Time to read: 14 min
Index
Overview of Post-Processing
ABS (Printed on a Dimension Elite)
ABS 3D Printed Part Finishing Process Materials Needed
ABS 3D Printed Part Sanding
Repairing the Incomplete Layer
ABS 3D Printed Part Priming and Painting
ABS 3D Printed Part: The Final Result
VeroBlack (Printed on an Objet30)
VeroBlack 3D Printed Part Materials Needed
VeroBlack 3D Printed Part Sanding
VeroBlack 3D Printed Part Priming and Painting
VeroBlack 3D Printed Part Final Results
PLA (Printed on a 5th gen. Replicator)
PLA 3D Printed Part Sanding
Finishing PLA 3D Printed Parts
PLA 3D Printed Part Priming and Painting
PLA 3D Printed Part Final Results
Results and Closing Thoughts
Differences in Process
ABS (Dimension Elite)
VeroBlack (Objet30)
PLA (Replicator 5th gen.)
Differences in Time
Differences in Cost and Materials
Comparison of the Final Results
Knowing how to finish 3D prints is a useful skill if you’re 3D printing parts or having 3D printed parts manufactured. This article details the different 3D printing finishing methods for FDM and PolyJet 3D printed parts, plus techniques and tips to elevate the look and feel of your prototypes.
Let’s start with a simple Apple Watch stand design as a case study. This stand has pockets and internal and external features that need to be finished to a standard that complements the shiny exterior of an Apple Watch. Usually, parts need extra work to get to the desired surface finish, and learning how to create such a finish is a key skill that can save you money on post processing in the long run.

3D printing post processing is ultimately dependent on the type of material your 3D printed part is made from. For the purposes of this analysis, we’re going to compare three base materials:
- PLA: PLA is the optimal material choice for tight budgets; the results aren’t as polished but the price is cheapest.
- ABS: For moderate budgets, ABS is a great choice. It’s not as cost-effective as PLA but it provides more reliability than PLA.
- VeroBlack or VeroWhite: VeroBlack and VeroWhite create the highest quality parts, with the best dimensional accuracy and the most polished finish.

Overview of Post-Processing
Every print presents unique challenges and considerations that must be accounted for in order to arrive at the best finish possible. The post-processing for our watch stand involves a combination of repairing and preparing the print for sanding and painting, and the finished sample of all three materials should have smooth, matte black surfaces.
Note: We have detailed the print settings process for each material separately below and included a summation of the results in the conclusion of this article.


ABS (Printed on a Dimension Elite)
The Dimension Elite prints are smooth, clean, and ready to sand out of a post-printing NaOH bath.

There are, however, clear stepping lines between the printed object layer lines. If we don’t remove those lines, they’ll show up in the final coat of paint and ruin our smooth finish. Thankfully, removing these lines is easy thanks to ABS’s high melting point and sandability.
ABS 3D Printed Part Finishing Process Materials Needed

The materials needed for finishing 3D printed parts:
- Sandpaper (grits 100 to 600)
- Medium, fine, and extra-fine sanding sponges
- XTC-3D brush-on coating (As an alternative, Bondo putty is a common solution to fill holes in parts. We chose XTC-3D for its viscosity, sandability, and ability to penetrate small perforations, which makes it desirable over Bondo putty)
- Razor blade
- Foam brush, mixing cups and popsicle sticks
- Sandable Krylon Primer
- Montana Acrylic Primer in Shock Black
- Matte Acrylic Varnish
ABS 3D Printed Part Sanding
Learning how to smooth 3D prints with sandpaper is not as intimidating as it may seem, and sanding our ABS print is simple and straightforward. First, start with 100 – 200 grit sandpaper to remove stepping lines and then gradually increase up to 600 fine grit sandpaper to achieve a smooth finish and remove all sanding lines.
Pro Tip: Sand in small circular movements evenly across the surface of the part, and avoid sanding 3D prints in one direction only, especially in the direction of the stepping lines to prevent striations or “trenches” in the print.
Beware that sanding ABS removes material quickly, so be careful not to overdo it — as little as .010” can be enough to completely remove any stepping layers and oversanding can compromise critical dimensions.
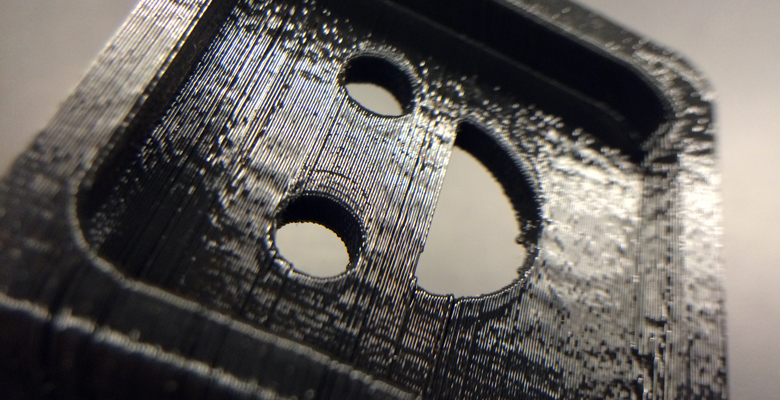
After sanding, there are some holes on our part left by an incomplete layer around the letters DIM. These holes can perforate through the finished paint coat and create sinkholes, so we need to find a solution.

As you can see in the Catalyst tray to the right, there are large holes between the DIM and the edge of the part. Moving the DIM up in our Solidworks model would solve this issue, but we’ll have to find a way to fill these holes with a sandable 3D print filler.
Repairing the Incomplete Layer
We’re going to use a thin, sandable epoxy called XTC-3D to fill in the print. XTC-3D is cost-effective, quick, thin, and high-performing. Note that a small amount goes a long way, and you should always follow the manufacturer’s recommended pot life.
Pro-Tip: Maintain a weight ratio of 100 Part A to 42 Part B and mix thoroughly for one minute and coat your part within the pot life. For more details, check Smooth-On’s technical bulletin here, and there’s a great instructional example here.
Before applying the XTC-3D, wash the part with soap and dry with compressed air to ensure your part is thoroughly clean and free of any oils and sanding dust — and wear gloves so you don’t get any hand oils or sweat on your part.

Fill in holes or gaps in your print with a very thin (1/64”) coat — a thin layer of XTC-3D will level itself out. We used a razor blade to scrape excess XTC-3D into the unwanted holes and gaps, making sure to avoid any areas we didn’t want filled (like the letters DIM).
Allow the XTC-3D sufficient time to become tack-free dry by following the manufacturer’s recommended cure time. Then sand away at the excess XTC-3D layer with 300 to 600 fine grit sandpaper to finish the repaired uniform surface.

After another thorough cleaning of the print, we’re ready to prepare our uniform surfaces for painting.
ABS 3D Printed Part Priming and Painting
You can paint 3D printed parts with a variety of materials, including acrylics, enamels, sprays, and airbrushes. For our example, we’ll use Montana spray can paints in a straightforward process: prime, dry, paint, dry, varnish, dry.
Standard spray-painting principles apply:
Make sure your surface is oil-free, dust-free and hole-free
Shake each paint can for at least two minutes prior to painting
Ensure the spray cap is clean to prevent drips
Pay attention to how the paint is accumulating on the part and look out for pooling and dripping
Paint in many light coats rather than fewer heavy coats — this is critical for 3D printed parts with internal and obscured geometries
Only paint in controlled, well-ventilated, and well-lit areas
Our dimension print started out with obvious stepping between layers, but if you’ve sanded and filled properly, these layers won’t show up in your final paint finish.
ABS 3D Printed Part: The Final Result

As you can see in the image above, our finished ABS part is matte black and smooth to the touch, with little evidence of layering on most surfaces. Also, there are a few important elements to note specifically:
- Sharp internal pockets are tough to sand. After 30 minutes of sanding, we still couldn’t remove all the layering and the stepping even after priming, painting, and varnishing.
- Because we had to remove more surface material during sanding, we had to sacrifice some dimensional accuracy in the final geometry of the part.
- Filling the incomplete layer with a thin coat of XTC-3D worked well — the holes disappeared in the final paint layer.
VeroBlack (Printed on an Objet30)
Thanks to its ability to print at .0011” resolution, the Objet30 print has some stepping between layers, but they aren’t nearly as obvious as in our FDM print.

Objet30 prints come out of the printer with a thick layer of support structure material, so our first finishing step is to remove this support structure and the residue it leaves behind.
VeroBlack 3D Printed Part Materials Needed
These are the materials you need for finishing VeroBlack printed parts:
- Sandpaper (grits 100 to 600)
- Medium, fine, and Extra fine Sanding Sponges
- Sandable Krylon Primer
- Montana Acrylic Primer in Shock Black
- Matte Acrylic Varnish
VeroBlack 3D Printed Part Sanding
Once the support structure has been removed, start with 100 grit sandpaper to wet sand the residue, then gradually move to wet sand with 300 grit sandpaper — the residue will fall off in small soft white chunks. This is the hardest part of the VeroBlack finishing process and it took about 40 minutes to remove the residual layer. If you rub the part with your fingernail before sanding, you’ll feel it’s harder and more plastic-like beneath the gummy residual coat.

After removing the residual layer, the surface of the part will begin to feel smooth, so continue wet sanding through to 600 fine grit sandpaper until the part is fully smooth.
Pro-Tip: Water breaks up the residue, so wet sanding is a highly effective method to get a smooth, residue-free, paintable, and homogenous surface.
After sanding, thoroughly clean your part with soap and water to remove any additional residue. Again, we recommend using compressed air to dry the part and clear any accumulated dust.
Note that VeroBlack is like ABS. Once you break through the residual layer, the actual VeroBlack material is easily removed, so be careful not to overdo it and compromise critical dimensions. Removing as little as .005” is usually enough to completely remove any stepping layers.
VeroBlack 3D Printed Part Priming and Painting
We can paint the VeroBlack part just as we did the ABS part, by using Montana spray paint with the following process: prime, dry, paint, dry, varnish, dry.
Again, standard spray-painting principles apply:
- Make sure your surface is oil-free, dust-free and hole-free
- Shake each paint can for at least two minutes prior to painting
- Ensure the spray cap is clean to prevent drips
- Pay attention to how the paint is accumulating on the part and look out for pooling and dripping
- Paint in many light coats rather than fewer heavy coats — this is critical for 3D printed parts with internal and obscured geometries
- Only paint in controlled, well-ventilated, and well-lit areas
VeroBlack 3D Printed Part Final Results

Our finished VeroBlack part is matte black and smooth to the touch, however, some of the internal corners weren’t sanded enough to remove the residue, so you can see how the paint powdered up in these areas (see item 1 in the image above). This will likely result in peeling paint over time. Also, some small stepping is visible on the part (see item 2 above), but another 30 minutes of thorough sanding would have eliminated both issues.
PLA (Printed on a 5th gen. Replicator)
Lastly, we have a print of PLA, a notoriously difficult material to finish. However, with some tricks and patience, this print can join the ABS and VeroBlack prints in all their matte finish glory!

Our PLA Replicator print came off the plate with severe striations: see the parallel grooves in the layers of the part above, which could be a result of printer quality. Regardless, we can still smooth out those grooves.
Sanding PLA is difficult, in part because of how soft and gummy it becomes if you sand too aggressively, so we need options for smoothing with minimal effort and abrasion.
PLA 3D Printed Part Sanding
If you choose to sand PLA directly, the process is straightforward. Begin with a low (100 – 200) grit sandpaper, sanding away at the bumpy striations and any raft or support material left behind. Particularly in the case of MakerBot supports, it’s easiest to remove them with a flush cutter or pair of pliers and brush them with a rotary multi-tool first before sanding.
Depending on the size and geometry of your part, you’ll likely be stuck in the 100 – 300 grit sandpaper range for a while to smooth out striations and support structure remnants.
Once layering and striations are less prevalent, move through finer grits (400 – 600) sandpaper to achieve a shiny surface ready for priming and painting.
Pro-Tip: Patience is key with any process you use to finish 3D prints, especially when sanding PLA. Turn on a movie or your favorite show, but don’t zone out! Sand in small circles evenly across the surface of the part. If you’re using a sanding multi tool on PLA, be careful not to overheat/melt your 3D printed part.
Note: PLA acetone smoothing is not advisable. PLA smoothing is not as forgiving as ABS when it comes to sanding and abrasion, so you will likely spend more time removing the stepping between layers, especially with the severe striations in a print like ours.
An alternative method to sanding PLA prints directly is smoothing the PLA print with the XTC-3D first and then sanding the coating.
Finishing PLA 3D Printed Parts
Before applying XTC-3D, ensure that your part is thoroughly clean, free of any oils and sanding dust — are you sensing a pattern yet? Wash the part with soap and dry with compressed air to clear any dust, and wear gloves to protect both your part and your hands.

Brush on the first coat of XTC-3D in a thin (1/64”) coat, which will level itself out. It may be difficult to coat an entire part at once, so you can do it in sections as long as you keep overlapping to a minimum between sections. Wait 90 minutes between first and second coats and after you’ve finished, wait 2 hours to allow the shiny surface to become tack-free.
With striations as severe as ours, it will take multiple coats to get a smooth uniform surface, so patience is key. Remember that multiple thin glossy finish coats will level better than thick coats.
Pro Tip: Internal pockets are susceptible to pooling, so be careful to remove any pooling that occurs before the XTC-3D begins to dry.
Beware that XTC-3D may compromise critical dimensions, but applying thin coats will minimize the effects of the additional material.

After the XTC-3D layer has hardened for two hours after application of the last coat, you’re ready for sanding. Start with 300 grit sandpaper and sand in small circular movements to even the surface — wavy patterns may require a coarser grit sandpaper to remove. Focus on getting a level surface, moving through to 600 grit sandpaper.
After you’ve finished sanding, thoroughly clean your part with soap and water and dry it using compressed air before painting.

PLA 3D Printed Part Priming and Painting
Painting PLA follows the same process as ABS and VeroBlack parts: prime, dry, paint, dry, varnish, dry.
Again, standard spray-painting principles apply:
- Make sure your surface is oil-free, dust-free and hole-free
- Shake each paint can for at least two minutes prior to painting
- Ensure the spray cap is clean to prevent drips
- Pay attention to how the paint is accumulating on the part and look out for pooling and dripping
- Paint in many light coats rather than fewer heavy coats — this is critical for 3D printed parts with internal and obscured geometries
- Only paint in controlled, well-ventilated, and well-lit areas
PLA 3D Printed Part Final Results

The XTC-3D coated PLA part is matte, black, and has a smooth surface to the touch — but there are still some problems. Although the XTC-3D has worked well to smooth the part and make sanding quicker and easier, it pooled in the internal pocket and is showing through the paint finish. Also, striations are still visible on the part — another 30 minutes of sanding could have prevented these from showing through the final paint finish.
Get the Ultimate Guide to Finishing 3D Printed Parts

Looking for more on finishing 3D printed parts? Check out the Ultimate Guide to Finishing 3D Printed Parts e-book for everything you need to know about the finishing techniques Fictiv offers, most of which we didn’t even touch on in this article:
- Priming/Painting
- Dyeing
- Clear Coating
- Sanding
- Vapor Smoothing
- Polishing
- Media Blasting
- Tumbling
We’ll also walk you through the available colors and finish types for each material, as well as secondary process compatibility for each material, as some are not able to be processed with two finishing methods. Go on and grab a copy, it’s free!
Pro-Tip: When specifying 3D printed part finishing requirements, ensure you take into consideration customer requirements, quality specification conformance, and environmental conditions.
Results and Closing Thoughts
After finishing all three parts to a smooth, matte black finish, let’s take a look at the differences in process, time, materials and finish.


Differences in Process
ABS (Dimension Elite)
- Sand from 100 to 600 grit
- Repair holes with XTC-3D (may not apply to your part)
- Sand away XTC-3D with 300 to 600 grit
- Prime, Paint, Varnish
VeroBlack (Objet30)
- Sand from 100 to 600 grit
- Prime, Paint, Varnish
PLA (Replicator 5th gen.)
- Coat in 1 to 3 layers of XTC-3D (depending on how bad the striations on your print are)
- Sand away XTC-3D with 100 to 600 grit
- Prime, Paint, Varnish
Differences in Time
The part that took the longest to finish was PLA due to the XTC-3D coating application, but even without XTC-3D, PLA typically takes longer to sand than ABS or VeroBlack.
In our example, the VeroBlack was ultimately faster to finish since we repaired our ABS print with XTC-3D and stepping between layers was not as significant in the VeroBlack print.
All things considered, VeroBlack was the quickest to get to a smooth, matte black finish.
Pro-Tip: If you’re in a rush to get from printer to photoshoot, use the Dimension Elite or Objet30 printers. Especially in models with overhangs and significant amounts of support material, the Dimension Elite and Objet30 support material is quickly removable via dissolution, whereas the PLA supports on a Replicator print require a lot more time to remove.
Differences in Cost and Materials
PLA is the cheapest out of the three, at $20 per part, followed by ABS at $55, and VeroBlack at $110 — though that doesn’t account for the value of the time and effort required to get a finished part. In our opinion, VeroBlack is the best bang for your buck since it’s the easiest surface to finish and will give you the most accurate model.
The Final Results
At first glance, all three Apple Watch stands look similar, but there are a few key differences in the final finish.
Both the ABS and the PLA finished prints have evidence of stepping between layers that is visible in the final product. The VeroBlack print requires far less effort to remove these steps, and they ultimately are not as obvious in the final paint coat.
Although the ABS and the VeroBlack finished prints have similar surface finishes, more material (approximately .020”) was removed in the sanding process for the ABS to remove stepping between layers. In contrast, the VeroBlack print required less sanding, so the final dimensions are closer to the original design intent.
Here’s a summary of key points to understand about each print:
VeroBlack: High layer resolution (.0011”) means little sanding is required to get a smooth, paintable part. Critical dimensions don’t need to be compromised to get a smooth surface quality part and no repairs are needed for fine detailed features.
ABS: Parts are easy to sand, but small fine detailed features may require repairing and careful sanding to remove stepping between layers. Once this stepping is removed, painting is straightforward.PLA: The cheapest option, but also has the potential to be the most difficult to finish, depending on support structures and quality of the print. May require significant sanding and repairing via XTC-3D or Bondo filler.
Key Takeaways for Finishing 3D Printed Parts
- Finishing a 3D printed part often involves a combination of the following processes: smoother application, sanding, polishing, cleaning and painting. The process is unique to the material type.
- A smooth finish with 3D printing is achievable but, post-processing will greatly improve the smoothness of parts.
- Epoxy resins are an excellent choice for sealing PLA printed parts.
- Acetone smoothing is not recommended for PLA prints.
- In general, IPA or rubbing alcohol will not dissolve PLA but there are some varieties that may be IPA soluble. Consult your filament material datasheet or technical datasheet for more information.
- PLA may be smoothed without sanding by dipping it or spraying it with a coating.
- ABS is tougher and lighter than PLA which is stronger and stiffer. Both have their ideal applications, but PLA is typically considered a hobby material whereas ABS is ideal for prototyping.
- Get a free copy of the Ultimate Guide to Finishing 3D Printed Parts.
Fictiv: Sourcing Simplified
For all your 3D printing service and finishing needs, Fictiv has you covered. We’re experts at producing custom 3D printed parts, in a variety of materials, and we simplify custom part sourcing with intelligent, streamlined, automated workflows. Fictiv is your operating system for custom manufacturing that makes part procurement faster, easier, and more efficient. Fictiv’s portfolio of optimized manufacturing services also include CNC machining, injection molding, and urethane casting.
Create an account and upload your design today to see what our instant quote process, DFM feedback, and intelligent platform can do for you.