Time to read: 4 min
Injection molding flash, or flashing, is excess plastic that forms on the surface of injection molded parts. Although some amount of flashing is expected during the injection molding process, excessive flash can mar a part’s surface finish or interfere with seating, sealing, or assembly.
Troubleshooting Injection Molding Flash covers the causes of flash, and this article contains tips to avoid or reduce excessive flashing. If you’ve had parts injection molded before, then you’ve already dealt with flash. One of the best ways to fight flash is with proper plastic part design — so you avoid what causes flash in the first place.
Even with these measures, it’s impossible to completely eliminate all flash in plastic injection molding. When flashing does occur, you can remove it during post-processing, but that can extend project timelines — download our injection molding gantt chart to map out your production timeline and plan for every eventuality.
Free Template: Injection Molding Gantt Chart
Now, let’s take a look at what you can do to reduce the risk of flash with your next injection molding design.

Proper Draft, Especially at Shut-Off Locations
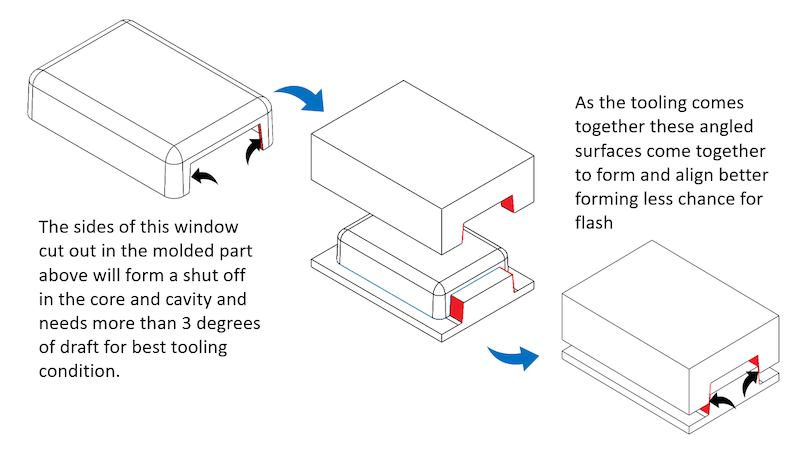
When you’re designing a plastic part for injection molding, it’s important to add draft so that your part can be removed from the mold without damaging the part or the finish applied to the part. In general, a draft angle is required on any perpendicular wall or feature to the line of draw, aka the point at which the two halves of the tooling separate.
Surfaces that produce a shut-off condition in the tool require extra draft to reduce flashing. Shut-off is a term that’s used to describe an area where there isn’t any plastic, but the cavity of the tool presses against the core of the tool to stop the flow of material in that area. The more draft provided, the better the shut-off condition in these areas.
Here’s a couple examples of common tooling features that produce a shut-off and require an additional draft of 3 degrees or more, if possible.
- Vertical window or opening in side of part
![Tips to avoid flash]()
- Design pass-through to allow for straight pull

Proper Wall Thickness for Your Selected Plastic Material
When you’re designing a part for injection molding, there’s another consideration that affects the pressure inside of the cavity and flashing — the wall thickness on which you model your part. In general, it’s best to keep parts within standard ranges for injection molding materials.
This chart shows some common thermoplastic materials and their recommended wall thickness ranges.
| Resin | Recommended Wall Thickness (mm) |
| ABS | 1.143 – 3.556 |
| Acetal | 0.762 – 3.048 |
| Acrylic | 0.635 – 3.810 |
| Liquid Crystal Polymer | 0.762 – 3.048 |
| Long-fiber Reinforced Plastics | 1.905 – 25.400 |
| Nylon | 0.762 – 2.921 |
| Polycarbonate | 1.016 – 3.810 |
| Polyester | 0.635 – 3.175 |
| Polyethylene | 0.762 – 5.080 |
| Polyphenylene Sulfide | 0.508 – 4.572 |
| Polypropylene | 0.635 – 3.810 |
| Polystyrene | 0.889 – 3.810 |
| Polybutylene Terephthalate | 2.032 – 6.350 |
| Polyetherimide | 2.032 – 3.048 |
| Peek | 0.508 – 5.080 |
| Thermoplastic Elastomer | 0.508 – 6.350 |
| Rigid PVC | 2.286 – 6.350 |
| Soft PVC | 0.635 – 3.810 |
| Polysulfone | 0.762 – 6.350 |
Proper Production Planning for Correct Tooling Life
Although it might not seem that important when you’re designing your part, you should thoroughly consider how many parts you’ll need from the proposed tool. This decision has a dramatic impact on flash since tooling will wear with use. The closer you get to the maximum number of shots that a tool can support, the more likely you are to experience flash.
That’s why it’s a good idea to spend a little more for harder tooling that reduces flash, especially if your total expected usage is anywhere near the maximum amount for the next lowest grade of material. For example, let’s say you’re considering an aluminum tool and plan to make a maximum of 10,000 shots. It might make sense to use P20 steel tooling that can produce 100,000 shots instead. By planning ahead, you can save time and money for the future of your program.
Flash isn’t desirable, but you’ll have to deal with it during injection molding. Designing parts with the end product in mind is an easy way to mitigate some of the issues that cause flashing in the first place. And ordering tooling that will last through the number of expected production cycles is a good idea, too. By working closely with your injection molder, you can help to ensure that issues surrounding flash are minimized from the beginning.
Fictiv — Complex Parts at Ridiculous Speeds
A good plan and skilled production partner are critical to avoid the added costs and risks that come with flash or improper processing methods for injection molded parts. Fictiv has the global manufacturing network and production experts you need to get quality injection molded parts, no matter how complex your designs. And we have the skills and know-how to troubleshoot issues like flash and support you from part design through prototyping and production.
Create your free Fictiv account and request an injection molding quote today — we mold complex parts at ridiculous speeds!