Recently TiVo came out with a new set-top box called Bolt and the internet had a lot to say about it. Because, well, it looks like this:

Is it winking at us? We’re not sure. But we are sure that we want to further investigate the design of this thing, as well as what lies beneath.
Packaging

The first thing we can’t help but mention is the massive sticker Best Buy slapped on, right over the hero shot. The nerve! Not to mention the box was totally mangled when we bought it—really degrades the unboxing experience.
Good reminder to consider retail and shelving protocols when designing your packaging (ie. where will the store labels be placed, does your product need to hang on shelves, will it be stored in the back with only display models present).
But, you’ll be glad to know the packaging itself really wasn’t that spectacular anyways. Pretty cheap corrugated cardboard, die cut and glued with a lithography print on top. Based on the weight of the cardboard, it’s already evident that TiVo didn’t care much or think through the packaging experience.
Cable Box

Pulling out the cable box, our first impression is that TiVo is trying to be like Apple. They wanted to go from a plain ol’ black box to something beautiful and eye-catching with white high-gloss finish and rounded corners we’re so familiar with.
We can just imagine some executive talking with one of their designers saying, “you know… just make it more like Apple!”
We should note, however, that the angled chassis supposedly increases the airflow beneath the box, so the fan can cool its dual-core CPU and 3GB of DDR memory more effectively. It’s perhaps not all design for design’s sake.


The cable box is covered with a protective film, which is important when shipping the product to keep its surface prestine.
The photo on the right shows what happens when you scratch just your fingernail on the surface; we talk a lot with our customers to consider the surface both before and after you unwrap the product.

What’s really bugging us in the design, however, is how bad the tolerances are, which results in this unsightly gap in the back.

In the main hero image you see in the press, you can see the offset parting line in the front.
Making large injection molded parts fit together perfectly is a very challenging—and expensive—thing to do.

From an engineer’s perspective, we would have designed a purposeful gap or split-parting line so you’d have a nice even edge all the way along the line.

It also feels pretty cheap, like we could break it. We’re wondering at this point what the wall thickness is or if perhaps the ribs aren’t large enough. (Okay, the dude holding the box is 6’5…)

On the back we find the cableCARD slot. This is a pretty large component and it’s nice that they made it relatively accessible to install different cableCARDs.

Interesting to note that the spec info on the back is slapped on with a sticker vs silk screened (the norm).

Taking off the back casing we find a massive heat sink in the middle of the main PCB, which takes the heat off the surface of the main processor through the process of convection. We also see an off-the-shelf fan and the 500 GB hard drive.

Taking a closer look at a portion of the back plastic casing, we find a ton of interesting info on how this thing was made. Each company has their own marking style for categorizing injection molded parts, which is what all the markings on the back are for. The dots show the volume of parts made on a specific injection mold tool, and we also see this is ABS plastic.
We also noticed that some of the plastic parts came from a second revision mold (A2) and some came from a third revision mold (A3), which could be a theory on why the tolerances don’t quite match up…
Other injection molding 101 features: 3 snap fits, ribs for strength and rigidity + ejector pin with gates in the middle. This would have been made with a 2 part mold with 3 actions for the snap fits.

We also see that the walls here are at 2.1 mm thickness, a pretty standard wall thickness for consumer electronics. If TiVo wanted to make a more rigid body, they could have increased the number of ribs or changed the material.

On the side of the box we find a very interesting light pipe! Light pipes are awesome components many people don’t know a lot about, even though we see them in almost every consumer electronic device (Check out our guide to prototyping light pipes).
The wall thickness here is only .75mm (vs a nominal 2.1mm), which allows the light inside to shine through only the thin wall section.

The actual mechanism that directs the light is this LED shroud, which encases a clear PMMA plastic part to keep the light in. The basic principles of a light pipe is to have 100% internal refraction to direct the light to a specific point.


There’s also a second light pipe directing light through the center of the TiVo icon. This is a pretty cool light pipe mechanism which is mechanically simple, but very effective. There is a simple, single PMMS lightpipe which directs light to the semi-opaque black TiVo logo. On the main housing, there is a TiVo logo cutout which allows the black insert to fit in with 2 extruding pins. The clear PMMA lightpipe then redirects light from the LED to the edge of the black TiVo logo to create a ‘magically’ illuminated logo. Cool!

Here we have the antennas, spaced as far apart as possible in order to get the strongest signal possible. This is also why the antennas are facing different directions and we imagine there was close attention to detail during quality control to make sure the antennas were just so.
The antenna placing might have also contributed to constraints on the size of the device; a great example of design vs. engineering requirements.


Opposite of the antennas are the connector ports for the HDMI, RCA, USB etc. Since this is where the user will put the most stress on the device, TiVo decided (smartly) to reinforce the plastics here with a simple piece of stamped aluminum.
The piece of aluminum is attached using adhesive —a very simple and low cost solution— and it’s important to note that alignment here would have been very important to get right. To help assist with the alignment, the TiVo engineers leveraged the ribs, which contact the connector plate, to make sure the metal plate matches up with the 9 holes.

Last, but not least, here’s a high-res image of the main PCB. We’re in the process of creating a BOM for the main components on the PCB, so make sure to signup for our newsletter to get the update!
+ If you love EE and love the teardowns, give us a shout — we’d love to have you contribute for the next one.
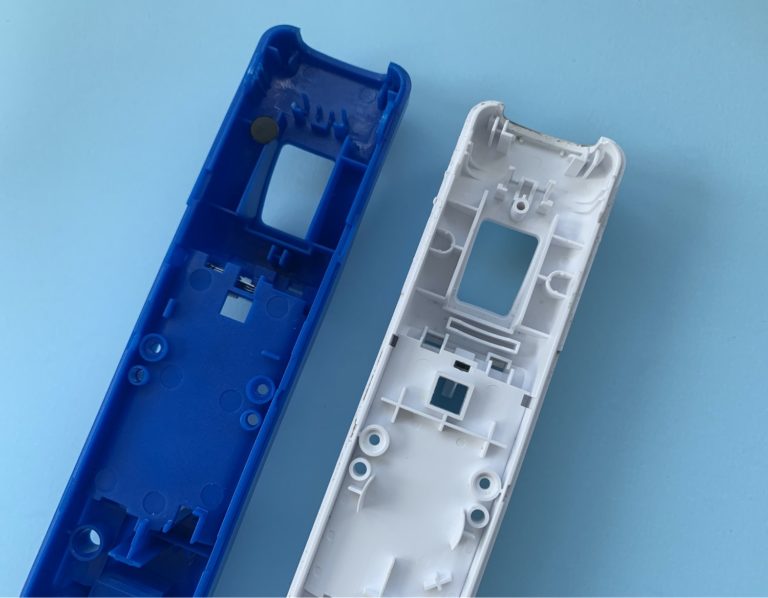
Controller

And onto the controller. The design of controllers is a very well-known, tried and true process. The front housing is a simple 2-part injection molded piece, as is the bottom black housing, while the rubber pad is compression molded silicon.

Ahh wonderful dremels, so useful!


After breaking open the controller, we see exactly what we expected—a single PCB which leverages the silicon pad to connect the leads to push each button. This is a very common design for controllers and we encourage you to take apart an old remote to check it out for yourself!Overall, we weren’t exactly impressed with the design of this flashy new TiVo box. That said, we’d argue industrial design isn’t a critical feature for a cable box — it just needs to work.
Now time to put this thing back together to see how it functions… 🙂