Time to read: 11 min
Prototype costs can range anywhere from under $50 for simple 3D printed parts to $10,000 or more for injection molded prototypes with tooling. The final cost depends on the manufacturing process, material selection, part complexity, tolerances, quantity, and lead time requirements.
This makes it difficult to estimate costs upfront without a clear understanding of what’s driving them. In this article, we’ll discuss typical price ranges, key cost drivers, and how different manufacturing methods compare. Getting a clear picture of what to expect can help you make smarter decisions as you move from concept to production.
General prototyping costs depend on the process:
- 3D printing is the lowest-cost option for early-stage prototypes
- CNC machining costs more but provides production-grade materials and precision
- Urethane casting supports low-volume functional parts
- Injection molding has the highest upfront investment but becomes cost-efficient at larger volumes

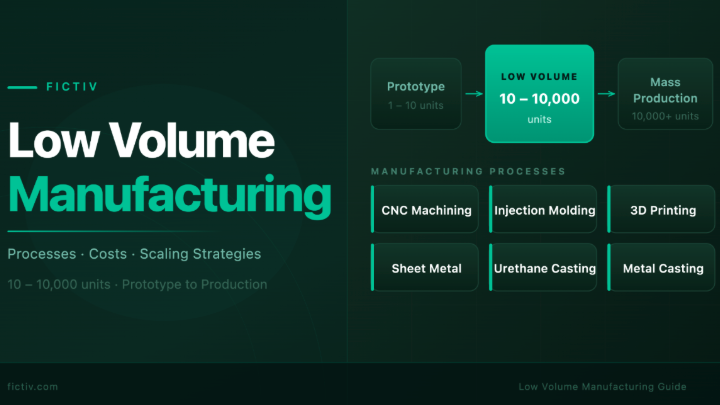
How Much Does a Prototype Cost?
Prototypes don’t have a fixed price, as many factors influence their price range. The manufacturing process is one of the biggest; knowing which process will be used to create the product can give clients a ballpark idea of what a prototype might cost.
As a general guideline, prototype costs tend to fall into the following ranges:
- Simple 3D printed prototypes: ~$20–$200+
- CNC machined prototypes: ~$100–$1,000+
- Urethane cast prototypes: ~$200–$5,000+
- Injection molded prototypes: ~$1,000–$10,000+ (including tooling)
These ranges are a helpful starting point, but actual costs vary depending on your design and the process technology used. Larger parts require more material and longer production times, both of which drive up cost.
The same applies to parts with fine details, complex geometries, or tight tolerances, all of which demand greater precision and effort to manufacture. Other factors, like materials and volume, will also affect the final prototype cost.
What Affects Prototyping Cost?
Several factors influence the cost of a prototype.
Manufacturing Process
Different processes have fundamentally different cost structures. 3D printing is one of the cheapest options for low volumes—materials are mostly inexpensive, setup is minimal, and there’s no special tooling involved. You can go straight from a digital file to a prototype in a matter of hours, sometimes days, depending on the project.
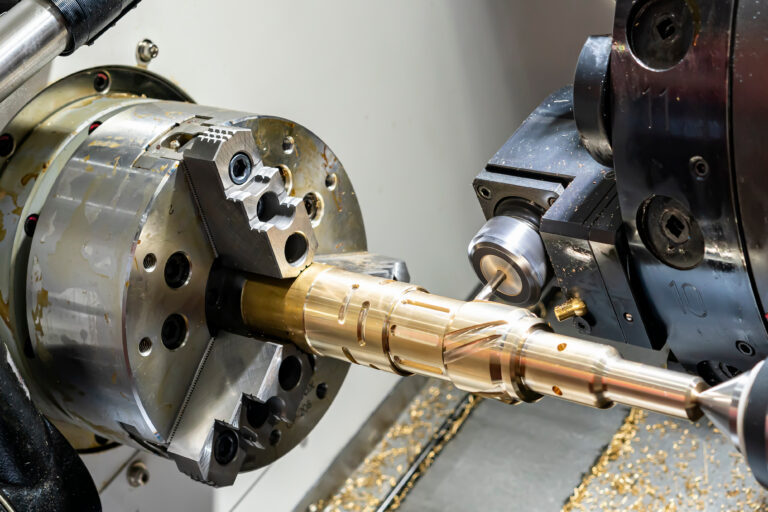
CNC machining works very differently. You’re starting with a solid block of material and cutting away everything that isn’t needed, which means you’re paying for machine time, tooling, and part complexity. Materials also tend to be more expensive, especially if you’re working with metals or high-performance plastics. And since the process is subtractive, it generates substantial material waste.
Injection molding takes this even further in terms of upfront cost. Before a single part can be made, a mold has to be designed and manufactured—that tooling process can be expensive and time-consuming. However, once the mold has been created, the cost per part drops as part volume increases. This is why injection molding is rarely used for early-stage prototypes, but it becomes cost-effective when you need larger quantities or production-like parts.
Material Selection
While the cost of materials can vary quite a bit, it’s only part of the picture. Materials also influence how easy or difficult a part is to manufacture, which in turn affects production time and overall cost.
Standard plastics used in 3D printing or CNC machining are often the least expensive, which is why they are so popular for early-stage prototypes where the goal is to validate design and fit rather than performance. Engineering-grade plastics offer better qualities like strength, heat resistance, and durability, but they also come with higher costs and can be more challenging to process.
Metals sit at the higher end of the cost range. Materials like aluminum are relatively common in CNC prototyping and offer a good balance between cost and performance, but harder metals like stainless steel and titanium require more machining time and specialized tooling, which increases the price. The same applies to specialty materials with specific properties, such as high-temperature resistance or chemical stability—they often come with both higher material costs and more demanding manufacturing requirements.
Part Complexity
The more complex a design is, the more time, precision, and effort it takes to manufacture.
Simple geometries are quicker and easier to produce, keeping costs lower. As designs become more intricate—with detailed features, tight tolerances, or specific surface finishes—production time increases. That can mean longer machining times for CNC parts, additional support structures in 3D printing, or more complex tooling in processes like injection molding.
Even small design choices can make a difference. Sharp corners, thin walls, deep cavities, and fine details all add complexity and can drive up cost more than expected. Simplifying geometry where possible is one of the most effective ways to keep prototyping costs under control without compromising the overall design intent.
Tight Tolerances and Surface Finish Requirements
Precision adds cost quickly. Tight tolerances require slower machining speeds, more careful inspection, additional quality control steps, and sometimes secondary finishing operations. Surface finish requirements can have a similar effect, especially when polishing, bead blasting, anodizing, or cosmetic finishing are involved.
In many cases, engineers specify tighter tolerances than the application actually requires. Relaxing non-critical tolerances can often reduce prototype cost without affecting functional performance.
Quantity and Volume
A single prototype usually has a higher cost per part because all the setup and effort go into just one unit. As volume increases, cost per part goes down. This is especially true for injection molding, where the tooling is expensive up front, but each additional part is much cheaper.
Even with CNC machining and 3D printing, small batches can help reduce the cost per part. That said, more parts still mean a higher total cost, so it’s important to only produce what you need at each stage.
Lead Time
The faster you need a part, the more you’ll pay. Short turnaround times often require prioritizing your job in the production queue, running machines for longer hours, or expediting shipping.
Leaving more flexibility with timing allows manufacturers to schedule production more efficiently, which usually results in lower pricing. Because of this, planning ahead can be an easy way to reduce prototyping costs without changing the design.
Supplier Coordination and Workflow Friction
Prototype cost isn’t limited to the part itself. Managing multiple suppliers, comparing quotes, resolving manufacturability issues, and coordinating timelines all add engineering overhead that’s often difficult to measure directly.
For many teams, consolidating workflows and reducing sourcing friction can have just as much impact on total prototyping cost as optimizing the manufacturing process itself.
Prototype Cost Breakdown by Manufacturing Process
Understanding how different manufacturing processes affect cost makes it easier to choose the right approach for your prototype.
CNC Prototyping Cost
With CNC prototyping, the main cost drivers are the machining time, the amount of material that needs to be removed, and the complexity of the setup. More intricate features mean longer production time, which directly increases cost.
CNC machining is usually the preferred process when precision and real-world performance are the priority. Its main advantage is its high accuracy and ability to use production-grade materials like metals and engineering plastics, making it ideal for functional testing.

3D Printing Prototype Cost
3D printing is usually the best performer for early design-stage prototypes. The technology enables fast iteration, allowing designers to quickly fine-tune their concept. These designs can be made using minimal material, and cheap plastics typically suffice for initial testing and validation.
Key cost drivers are the type of material used, the time it takes to print a part, and whether there’s a need for support structures in the print. The more complex the part and the finer the details, the longer it will take to print the parts—which can affect the need for supports and whether or not post-processing steps will be needed.
The biggest advantage of 3D printing is its low setup cost and fast turnaround. Its main limitation, however, is that parts may not always match the strength or durability of production components.

Urethane Casting Prototype Cost
Urethane casting is commonly used for low-volume functional and cosmetic prototypes that need production-like appearance without the high upfront cost of injection molding. The process typically starts with a 3D printed or CNC-machined master pattern, which is used to create a silicone mold for casting polyurethane parts. Tooling costs are much lower and lead times are faster than injection molding, making urethane casting a practical option for bridge production and small-batch prototype runs.
The main cost drivers for urethane casting are the creation of the master pattern, silicone tooling, material selection, surface finish requirements, and part volume. Silicone molds have a limited lifespan, so while urethane casting can produce high-quality parts with injection-molded-like aesthetics, it’s less cost-effective at higher volumes.

Injection Molding Prototyping Cost
Injection molding has a very different cost structure compared to the other methods. The biggest cost driver is tooling, which involves designing and manufacturing a custom mold before any parts can be produced. This upfront investment is what makes injection molding expensive for prototypes.
Once the mold is created, parts become less expensive to produce, especially at higher volumes. That makes injection molding a strong choice for production-ready prototypes or large-scale production of final parts. The trade-off is the high initial cost, which can be difficult to justify for small quantities or early-stage designs.

Prototyping Cost Comparison of Common Manufacturing Methods
| Process | Typical Cost Range | Setup Cost | Speed | Best For |
| 3D Printing | ~$20–$200+ | Very low | Fast (hours–days) | Early-stage prototypes, quick iterations |
| CNC Machining | ~$100–$1,000+ | Low– medium | Medium | Functional prototypes, high precision |
| Urethane Casting | ~$200–$5,000+ | Low– medium | Medium | Low-volume functional and cosmetic prototypes |
| Injection Molding | ~$1,000– $10,000+ | Very high | Slower up front | Production-intent parts, higher volumes |
Hidden Costs and How to Reduce Prototyping Costs
The upfront price of a prototype is only part of the story. Costs can add up in ways that aren’t always obvious at first.
Design iterations can quickly multiply costs if parts need to be remade multiple times. Scrap and rework add to the total, especially if something goes wrong during production. Managing multiple suppliers takes time and effort, and delays or missed deadlines can slow down your entire project. The cheapest prototype up front doesn’t always result in the lowest total prototyping cost.
The best way to reduce prototyping costs, as well as overall costs, is to make smart decisions early on.
- Keep geometry as simple as possible. Complex features increase manufacturing time and cost.
- Avoid unnecessary tight tolerances.
- Choose the right process for your stage. Use 3D printing for early concepts, CNC for functional testing, and molding when scaling.
- Standardize materials. Common materials are more affordable and easier to source, which helps reduce both cost and lead time.
- Use Design for Manufacturability (DFM) feedback early.
Low Volume Manufacturing Cost vs. Prototyping Cost
At some point, prototyping starts to shift into low-volume production. Instead of making one or two parts, you begin producing small batches for testing, validation, or early sales.
This changes the cost structure. While the total cost increases, the cost per part often drops. It also becomes more important to choose the right manufacturing process, as methods like injection molding may start to make more sense at this stage.
When Does Prototyping Become Low-Volume Manufacturing?
The line between prototyping and low-volume production is often less defined than teams expect. As quantities increase, the economics of manufacturing processes begin to change.
Processes that are cost-effective for one-off prototypes may become inefficient at batch quantities, while methods with higher upfront costs—such as injection molding—can become more economical as part volume increases.
This transition point depends on expected production volume, tooling investment, required material properties, and how likely the design is to change. For many teams, that challenge means choosing a process strategy that supports an efficient path to production.
In-House vs. Outsourced Prototyping Cost
One factor that affects prototype cost is whether parts are produced in-house or outsourced. Prototyping in-house gives you more control and faster access, but comes with higher overhead. Equipment, maintenance, processing, and skilled labor all add to the cost.
Outsourcing offers more flexibility and scalability. You can access different processes without investing in equipment, which can make it more cost-effective, especially as projects grow. It can also reduce the need to manage multiple suppliers, give you access to a wider range of manufacturing processes, and speed up production while lowering risks by relying on experienced manufacturers. A reliable outsourcing partner can help reduce costs by avoiding expensive mistakes.

How Fictiv Helps Optimize Prototyping Cost
Prototyping cost isn’t fixed. It depends on a combination of factors, from process and materials to design and volume. Choosing the right manufacturing method is critical, but design decisions often have the biggest impact on cost.
Fictiv simplifies the entire prototyping process by bringing everything onto a single platform. With instant quoting, you can quickly understand costs up front. Built-in DFM feedback helps you catch issues early, while process selection guidance ensures you’re using the right method for your part. Fictiv’s global manufacturing network makes it easier to scale without added overhead.
By understanding these factors and using the right sourcing strategy, you can not only reduce costs but also improve your overall development process.
Prototyping Cost FAQs
What is the cheapest way to make a prototype?
3D printing is usually the lowest-cost prototyping method because it requires minimal setup and no tooling. However, if a prototype requires production-grade materials, tight tolerances, or functional testing, CNC machining or urethane casting may provide better long-term value.
Why is CNC prototyping more expensive than 3D printing?
CNC machining typically costs more because it requires machine setup, cutting tools, programming, and longer production time. It also uses subtractive manufacturing, which can create more material waste. In return, CNC machining offers higher precision and production-grade materials.
How can prototyping cost be reduced?
Prototyping costs can often be reduced by simplifying geometry, avoiding unnecessary tolerances, using standard materials, and selecting the right manufacturing process for the development stage. Early DFM feedback can also help reduce costly redesigns and iteration cycles.
Is injection molding worth it for prototypes?
Injection molding is usually not cost-effective for early-stage prototypes because tooling costs are high. However, it can make sense for production-intent prototypes, bridge production, or projects that require production-grade materials and repeatability.
How does Fictiv help reduce prototyping cost?
Fictiv helps reduce prototyping cost through instant quoting, DFM feedback, process selection guidance, and access to a global manufacturing network. This helps teams reduce iteration cycles, simplify sourcing, and move from prototype to production more efficiently.
Can Fictiv support both prototyping and low-volume production?
Yes. Fictiv supports prototyping and low-volume production across processes including CNC machining, 3D printing, urethane casting, injection molding, and sheet metal fabrication.