Time to read: 8 min
Determining the correct tolerances to apply to your product design can be challenging. There are natural variations amongst products that occur in mass production and you should plan for these deviations when you are applying tolerances to products.
That said, you can decide how much a fabricated product can deviate from the engineering drawing dimensions and still be accepted. In manufacturing, this range of acceptance is defined by tolerance limits. These tolerance ranges represent the variations between nominal dimensions (the original intention of the design) and the maximum and minimum values of a dimension that still guarantees a fit. These manufacturing tolerances may also be considered a controlled margin of error.
Let’s consider an example:
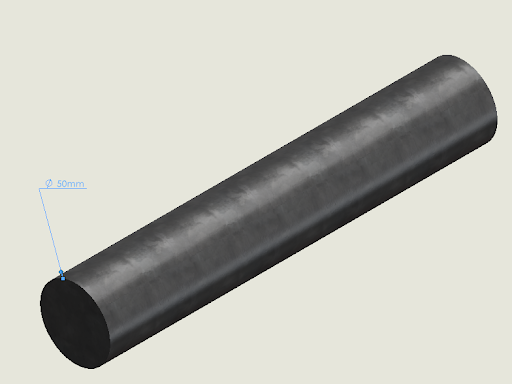
- Object to be manufactured: a round solid bar of 100mm length with Ø50mm that will fit inside of a hole in another component.
- You order 200 of these Ø50mm rounds bars
- Upon measuring the finished bars, you get values like Ø53mm, Ø47mm, Ø51mm, Ø49mm, equating to a range of a diameter of 47-53mm. The bars also vary in length and upon closer inspection, they’re not perfectly circular.
Can you still use them? If not, can you reject them and demand that the vendor redo them at no cost? How close to the Ø50mm should you really be?
The Lesson: an engineering drawing tolerance would tell you if the measured values above are within the acceptable range for the diameter dimension. A circularity tolerance would tell you if the non-perfect circular bar shapes are acceptable.
ISO 2768: An International Standard
ISO 2768 provides general standard metric tolerances (mm) for linear and angular dimensions without individual tolerance indications in four tolerance classes. It is an international manufacturing standard that can not only help to determine standard machining tolerances, but also minimize inconsistencies while accounting for manufacturing costs as well.
Because the standard was created by an international committee, it puts you on the same page as companies all around the world to prevent misunderstandings. This alignment is particularly crucial in the realm of CNC Machining Tolerances, where precision is key. Reflecting its status as a global industry standard, Fictiv’s CNC machining service adheres to the ISO 2768 tolerances, specifically meeting the medium requirements for precision.
ISO 2768 is divided into two parts that aim to simplify drawings by defining precision levels as general rules:
- General tolerances for linear and angular dimensions with precision levels defined as f-fine, m-medium, c-coarse, v-very coarse (also known as the four tolerance classes in DIN ISO 2768)
- Geometrical tolerances for features with precision levels defined as tolerances classes: H, K, and L
For example, a drawing could be specified as ISO 2768-mK, which means it should meet the tolerances ranges for “medium” from Part 1 and tolerance class “K” from Part 2. By including the ISO 2768 specification, you are simplifying your drawing, and avoiding writing tolerances for every dimension and feature.
The standard is made of general rules because there are exceptions when a dimension on a part needs a tighter tolerance than those set by ISO 2768. Such instances are normal, and not uncommon, so you should always check the drawing title block for general tolerance requirements and note any special part specifications or project requirements.
Applying ISO 2768 to a Drawing
In order to understand the content of this standard and its parts, it’s best to use a real world example. Figure 1 shows a vehicle engine with a compressor for AC. The component that supports the compressor and connects it to the engine is our focus; we’ll call it the “compressor base”. Our compressor base prototype example will be made from an aluminum casting, then machined and drilled.
Once we’ve defined a 3D model with nominal dimensions, we identify which features need tight standard machining tolerances and which ones don’t, so we can communicate these requirements on the drawing. We also include differentiating levels of tolerance to effectively manage costs.
If all dimensions require tight tolerances, then costs increase significantly due to more demanding tooling/fixtures, operator skills, and increased likelihood of scrap/rework requirements. (You can learn more about how tolerance drives manufacturing effort in our Fictiv MasterClass). Lead times also increase since each part needs a strict quality check to corroborate each dimension — especially when components have complex compound geometries that aren’t easy to quantify.
When you design a part, it’s important to foscus on the main function of each feature. Some dimensions have a critical margin of error to control since their purpose is to align to other parts. Other features have dimensions and locations that aren’t critical for alignment, so they can have wider general machining tolerances during fabrication. All these considerations are about the tradeoff between accuracy and cost.
For our compressor base example, Figure 2 shows which features require a tight tolerance and which ones do not. Keep in mind, this is an example that differs from other designs, but every designer should develop a proper classification based on their product’s function.
In our case, the drilled holes to connect the engine block to the compressor need to be aligned and positioned correctly, so their tolerance is in the fine category (see #1 and #2 in Figure 2). The contact surfaces between components are also important for alignment (#3 and #4). However, for this example, we’re able to use a medium tolerance since a more accurate machine roughness doesn’t benefit alignment enough to justify the extra cost.
Because the purpose of the ribs is to add strength, their wall thickness can be defined with a less rigorous tolerance as long as it meets the lower limit (#5, coarse tolerance). The main body of the base is defined as very coarse tolerance (#6) and we define references planes or datums to control the rest of the dimensions (#7, fine tolerance since we will be dimensioning from these surfaces). Keep in mind that for other designs, ribs, fillets, and chamfers might require tighter tolerances, depending on their function.
It bears mentioning that other standards work with similar dimensional concepts, the most common of which is Geometric Dimensioning and Tolerancing (GD&T), which is related to ISO 2768 Part 2. Learn more about the basics of GD&T here.
ISO 2768 Part 1: Linear and Angular Dimensions
Table 1 shows the precision levels or tolerance class designation for linear dimensions, per the ISO 2768 standard. One application is the dimension between holes for our compressor base example (see Figure 3).
| Permissible deviations in mm | ||||
| Basic size range in mm | f (fine) |
m (medium) |
c (coarse) |
v (very coarse) |
| 0.5 up to 3 | ±0.05 | ±0.1 | ±0.2 | – |
| over 3 up to 6 | ±0.05 | ±0.1 | ±0.3 | ±0.5 |
| over 6 up to 30 | ±0.1 | ±0.2 | ±0.5 | ±1.0 |
| over 30 up to 120 | ±0.15 | ±0.3 | ±0.8 | ±1.5 |
| over 120 up to 400 | ±0.2 | ±0.5 | ±1.2 | ±2.5 |
| over 400 up to 1000 | ±0.3 | ±0.8 | ±2.0 | ±4.0 |
| over 1000 up to 2000 | ±0.5 | ±1.2 | ±3.0 | ±6.0 |
| over 2000 up to 4000 | – | ±2.0 | ±4.0 | ±8.0 |
In a similar way, Table 2 shows the tolerances for external radii and chamfers.
Table 2: Tolerance Classes – External Radii and Chamfers
| Permissible deviations in mm | ||||
| Basic size range in mm | f (fine) |
m (medium) |
c (coarse) |
v (very coarse) |
| 0.5 up to 3 | ±0.2 | ±0.2 | ±0.4 | ±0.4 |
| over 3 up to 6 | ±0.5 | ±0.5 | ±1.0 | ±1.0 |
| over 6 | ±1.0 | ±1.0 | ±2.0 | ±2.0 |
Table 3 defines the general tolerances for angles/angular dimensions. Notice the tolerance units on Table 3 are degrees and minutes, because it’s an angular dimension. In the next section we will discuss “perpendicularity”, whose units are actually length (mm) despite the fact that the perpendicularity controls two surfaces in an angle.
Table 3: Tolerance classes – Angular Dimensions
| Permissible deviations in degrees and minutes | ||||
| Basic size range in mm (shorter side of the angle concerned) | f (fine) |
m (medium) | c (coarse) | v (very coarse) |
| up to 10 | ±1º | ±1º | ±1º30′ | ±3º |
| over 10 up to 50 | ±0º30′ | ±0º30′ | ±1º | ±2º |
| over 50 up to 120 | ±0º20′ | ±0º20′ | ±0º30′ | ±1º |
| over 120 up to 400 | ±0º10′ | ±0º10′ | ±0º15′ | ±0º30′ |
| over 400 | ±0º5′ | ±0º5′ | ±0º10′ | ±0º20′ |
ISO 2768 Part 2: Geometrical Tolerances for Features
Part 2 defines the tolerance ranges H, K and L. These are different from the fitting and clearance tolerance grades that also use letters and numbers. Similar to ISO 2768 Part 1, there are nominal ranges and deviations, but the difference is how we define those deviations.
For example, instead of defining an upper limit and a lower limit, in Figure 4 we define a region between two references (i.e. parallel planes), so the fabricated surface should lie between them. This may sound more complicated, but it makes sense when you realize that if you place a caliper to measure two rough surfaces, you’ll get multiple different values due to the roughness of the surfaces. We define datums to use as a reference for dimension to controlling how much deviation is acceptable. In Figure 2, we picked three perpendicular planes for the base compressor (datum A, B, C on Figure 1).
Table 4 defines Flatness and Straightness tolerance classes. In our compressor base, the contact surfaces between compressor and base and the contact surfaces between base and engine are important, so their flatness will be specified in the drawing.
Straightness controls how much a surface varies within a specified line on that surface. Another use of straightness is for the axis of a part to control how much bend or twist is allowed.
Table 4: Straightness and Flatness Tolerances
| Permissible deviations in mm | |||
| Ranges of nominal lengths in mm | H | K | L |
| up to 10 | 0.02 | 0.05 | 0.1 |
| over 10 up to 30 | 0.05 | 0.1 | 0.2 |
| over 30 up to 100 | 0.1 | 0.2 | 0.4 |
| over 100 up to 300 | 0.2 | 0.4 | 0.8 |
| over 300 up to 1000 | 0.3 | 0.6 | 1.2 |
| over 1000 up to 3000 | 0.4 | 0.8 | 1.6 |
As mentioned before, Perpendicularity has distance units (mm or in). Similar to Flatness, we define two planes separated by a gap equal to the permissible deviation in Table 5. We control the 90 degrees angle indirectly since we’re measuring whether the surface is in the permissible region or not. (see Figure 6)
Table 5: Perpendicularity Tolerances
| Permissible deviations in mm | |||
| Ranges of nominal lengths in mm (shorter side) | H | K | L |
| up to 100 | 0.2 | 0.4 | 0.6 |
| over 100 up to 300 | 0.3 | 0.6 | 1 |
| over 300 up to 1000 | 0.4 | 0.8 | 1.5 |
| over 1000 up to 3000 | 0.5 | 0.8 | 2 |
Table 6 shows the tolerances for Symmetry and permissible deviations for two features on a part that are uniform across a datum plane.
Table 6: Symmetry Tolerances
| Permissible deviations in mm | |||
| Ranges of nominal lengths in mm | H | K | L |
| up to 100 | 0.5 | 0.6 | 0.6 |
| over 100 up to 300 | 0.5 | 0.6 | 1 |
| over 300 up to 1000 | 0.5 | 0.8 | 1.5 |
| over 1000 up to 3000 | 0.5 | 1 | 2 |
Table 7 corresponds to Run-out, which is the total variation that a surface can have when the part is rotated around a datum’s axis. Notice that the marked surface is in tolerance even though it is not perfectly cylindrical.
Table 7: Run-out Tolerances
| Permissible deviations in mm | |||
| Circular Run-out | H | K | L |
| – | 0.1 | 0.2 | 0.5 |
You may have noticed that there is no table defined for parallelism. This is because ISO 2768 Part 2 defines parallelism as equal to the numerical value of the size tolerance or the flatness/straightness tolerance, whichever is greater.
Conclusion
ISO 2768 covers some of the tolerance and geometric characteristics used in manufacturing, but there are more standards in Geometric Dimensioning and Tolerancing (GD&T). For those interested in the topic, we recommend you read more about GD&T and the ASME Y14.5 standard and you can see all of the GD&T symbols here.
Some companies also utilize a method called Model Based Definition (MBD) to facilitate collaboration by including all GD&T, tolerances, and datum information in 3D models rather than 2D drawings. In theory, it’s possible to do so since some CAD software has tools to include these symbols and values as parametric information. It’s an interesting idea, but replacing 2D drawings with 3D models as the record of authority probably won’t be happening any time soon.
Regardless of how you implement ISO 2768 tolerancing, Fictiv can meet your requirements. Create an account and upload your part to see what Fictiv’s instant quoting and DFM can do for you.


