Time to read: 8 min
Overmolding vs. insert molding is a comparison between two molding processes that have things in common but also key differences.
- Overmolding molds one part from one material and then molds another material over the first molded part. That’s why it’s sometimes called multi-material molding or, when injection molding is used, two-shot molding.
- Insert molding begins when a pre-fabricated, pre-formed, or previously molded part is placed in a mold and then molded over with a different material. Sometimes, the insert is made of metal. However, non-metal inserts can also be used.
With overmolding and insert molding, parts are bonded together seamlessly. Whether it’s to improve comfort, provide sealing, increase safety, or reduce noise and vibration, these two processes are used in a range of applications. But which process do you need? And how do they compare?

How Overmolding and Insert Molding Are Similar
Overmolding and insert molding both:
- Support the use of plastic and rubber, including thermoplastic elastomers (TPE)
- Join together multiple materials without adhesives or fasteners
- Leverage the individual properties of the constituent materials
- Support the use of either injection molding or compression molding
- Follow the design rules of injection molding or compression molding
- Have some special design considerations of their own
Sometimes, overmolding and insert molding can be used for the same applications. For example, a plastic toothbrush can have a hard plastic handle with a softer silicone grip. Both parts are molded, but not necessarily in the same tool, in the same machine, and in a continuous cycle.
How Overmolding and Insert Molding Differ
Overmolding and insert molding differ in that:
- Only overmolding molds two different parts in succession (i.e. same tool, same machine, same cycle)
- The tooling for overmolding is more complex and, therefore, more expensive
- Only insert molding supports the use of metal components
- Insert molding is generally more cost-effective for lower volumes
Insert molding can support some applications that overmolding cannot. For example, a screwdriver usually has a metal blade and a plastic handle. The plastic handle can be molded, but the metal blade cannot. Therefore, insert molding is needed.
Keep reading to learn more about the differences in how overmolded and insert molded parts are designed, made, and used. Then create a free Fictiv account and upload your part drawing. Along with your quote, you’ll get expert design for manufacturability (DFM) assistance.

How Overmolded Parts Are Made
Overmolding always begins by molding the first part, which is sometimes called the substrate. Depending on whether compression molding or injection molding is used, the rest of the process varies.
Overmolding with Compression Molding
Overmolding with compression molding begins when an operator puts a pre-measured amount of plastic or rubber material into the mold. The operator then closes the mold, which is usually preheated. Heat and pressure from the compression molding press cause the material to flow and fill the mold. The part cools, the mold is opened, and the part is removed by hand or ejected with pins.
Next, the molded part is placed inside a different mold. Technically, this makes overmolding with compression molding more like insert molding. Next, an operator adds a pre-measured amount of plastic or rubber material and closes the compression mold. Heat and pressure are applied, and the second material covers some or all of the previously molded part, depending on the mold’s features.
Compression molds cost less than injection molds, but remember that two different tools are needed for overmolding with compression molding. The first mold produces the first part, and the second mold is where the overmolding occurs. A process that requires multiple tools carries higher costs, but overmolding with compression molding may still be less expensive than injection molding.
Overmolding with Injection Molding
Overmolding with injection molding uses an injection molding machine that’s equipped with two barrels and can mix two different materials, such as a harder plastic and a softer silicone. After the first material is mixed and heated, it’s injected into the mold. The part then cools but is not ejected from the tool. Instead, a second shot with the second material is injected into the mold.
This second material overmolds some or all of the first part. After the second material cools and solidifies, the mold opens and the overmolded part is ejected. A single mold is used for the entire process, but this type of tool is more expensive because it’s more complex. That’s why overmolding with injection molding is generally used with higher production quantities.

How Insert Molded Parts Are Made
Insert molding always begins by placing an existing part into the mold. Whether this insert is pre-fabricated, pre-formed, or previously molded, it’s essential to place the part inside the mold in the proper location. Then, depending on whether compression molding or injection molding is used, the rest of the process varies.
Insert Molding with Compression Molding
Insert molding with compression molding begins when an operator places the insert into a compression mold. This pre-fabricated or pre-formed component is often made of metal, such as a threaded fastener, a knife blade, or pins for electrical connections. Alternatively, the insert can be made of a non-metal material such as rubber or plastic. Other types of material (such as ceramic) can also be used, but metal, rubber, or plastic are most common.
Next, an operator adds a pre-measured amount of plastic or rubber material to the mold, which already contains the insert. When heat and pressure are applied, the material flows and covers some or all of the insert, depending on the mold’s features. The material cools, the mold is opened, and the insert molded part is ejected manually or automatically.
Insert Molding with Injection Molding
Insert molding with injection molding begins when a pre-fabricated, pre-formed, or previously molded insert is placed inside the injection mold. The injection mold is then closed, and a plastic or rubber material is heated and injected so that it fills the tool. The material cools, the mold opens, and the overmolded part is ejected automatically.
Because injection molding can be used to produce high volumes of parts, inserts are sometimes picked and placed with robots. Yet injection molding can still use an operator to physically place an insert inside a mold. Typically, this manual approach is used for low-volume injection molding, or when robotics or other forms of automation are unavailable.

How to Design Parts for Overmolding or Insert Molding
Overmolding and insert molding are sub-processes of compression molding and injection molding. That means if you’re designing a part that will be compression molded or injection molded, you need to follow the design guidelines for that process. Fictiv’s Ultimate Guide to Compression Molding contains helpful tips, and our Injection Molding Design Guide is a comprehensive e-book that you can download.
Download the Injection Molding Design Guide
Parts that are overmolded or insert molded also have some additional design guidelines.
Overmolding Design Guidelines
Follow these additional guidelines when designing overmolded parts.
- Make the overmold’s thickness less than or equal to that of the overmolded part.
- Avoid making the overmold so thick it could shrink away from the overmolded part during cooling.
- Select an overmold material with a melt temperature that does not exceed that of the overmolded part.
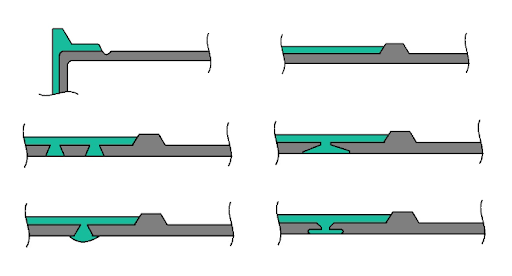
Silicone overmolding raises special considerations because it’s difficult to bond a silicone elastomer to a non-silicone polymer. Overmolding a liquid silicone rubber (LSR) with one durometer and color to an LSR with a different durometer and color is also challenging. With hard-to-bond materials, part designers can add recessed features called undercuts to promote adhesion.
Normally, designers seek to avoid undercuts unless they’re absolutely necessary. That’s because these part features complicate ejection and require the use of handloads, lifters, or sliders. Additional ejection mechanisms add costs to a mold, but remember that overmolding molds over the first part instead of ejecting it. Unless the overmold contains external undercuts, ejector pins alone or manual removal may be sufficient.
Insert Molding Design Guidelines
Follow these additional guidelines when designing insert molded parts.
- Avoid inserts with sharp corners and, when possible, use parts with knurling.
- Use inserts that are smaller than the molded parts in which you plan to embed them.
- With metal inserts, consider that off-the-shelf components (like standard fasteners) will cost less than custom parts that require design time and CNC machining.
If the molded-over part is made of silicone, remember that it’s difficult to bond a silicone elastomer to a non-silicone material. With insert molding, the insert itself helps to determine the best way to promote adhesion. For example, smooth metal inserts need surface roughening and may require specialized adhesives. Metal inserts with textured surfaces might not need roughening, but specialized adhesives can help.
Inserts that are made of plastic or rubber, including silicone, raise special considerations. Low surface energy (LSE) plastics may need plasma, corona, or flame treatment to promote adhesion. Applying a textured surface to the molded-over part can also help. Because the part texture is applied during the injection molding or compression molding process, producing a plastic or rubber insert requires the use of a textured mold, which increases tooling costs.

How Overmolded and Insert Molded Parts Are Used
Overmolded and insert molded parts are used in some of the same applications but also in different ones.
Examples of Overmolded Parts
In addition to toothbrushes, overmolded parts include children’s toys and infant care products. In these examples, a softer polymer that provides comfort and cushioning is molded over a harder polymer that provides strength and rigidity. With silicone overmolds, designers can leverage this elastomer’s thermal stability, broad temperature resistance, and biocompatibility. TPEs are also used to overmold parts because they combine rubber-like elasticity with recyclability.
Examples of Insert Molded Parts
Insert molding is used to produce more than just hand tools like screwdrivers. Plastic costs less than metal and is lighter weight, but metal inserts provide the wear resistance that’s needed within pulleys, knobs, and handles. Insert molding is also used to produce automotive sensors, electrical connectors, and bearings. Metal provides the electrical conductivity of the sensors and connectors, but the plastic housing provides electrical insulation and protection against environmental contaminants.
Overmolding Versus Insert Molding Isn’t a Contest
It’s easy to think of overmolding vs. insert molding as a contest between two molding methods, but the real goal is to help you choose the right technique for a winning product design. Fictiv provides insert molding and overmolding services, and we can help you determine whether compression molding or injection molding is the best choice for your application.
Even with complex parts, getting started is easy when you know where to begin. Create a free Fictiv account and upload your part drawing today.