Time to read: 7 min
You just finished the initial design of your product, and it looks great! Well, it looks great on your computer screen. So, you decide to make a prototype and see if your design looks and works as intended in real life.
Odds are that the first prototype won’t meet all of your expectations. In fact, chances are that you are going to have to repeat the process (re-design and then prototype) many times before you are ready to release production molds. We all know that product development is an iterative process. That being said, the fewer iterations you need, the quicker you can get to market and the less it costs you to get there.
The following guide will discuss several tips for getting the most out of each prototype, so you can get your product into production more efficiently. For the purposes of this article, imagine you’re in the midst of designing a new high-end water bottle and cap.
Tip #1: Don’t be Too Frugal When it Comes to Prototypes
In business, being late to the game can be very costly—so costly, in fact, that a past employer of mine used to calculate the hypothetical amount of lost profit for each day that a current project might run past its intended deadline. That number would trickle down to the development team, who would be empowered to spend up to that amount for anything that would likely cause more than a day’s delay to the project. If that number were $5,000, for example, we wouldn’t even have to ask permission to spend $1,000 to have our prototype job completed within a day instead of the usual two.
Think about that for a moment. It may sound crazy, but it’s completely logical. By spending $1,000 now, you potentially avoid losing $5,000 per day a few months down the road. This is certainly a situation in which money does solve problems.
I’m not advocating for spending foolishly—I’m simply saying that you shouldn’t let your desire to be frugal get in the way of the bigger picture.
Tip #2: Choose Your Prototyping Plan Based on the Prototype’s Actual Use
Before creating a prototype, you should really think about prototype definition (in other words, how it’ll be used). Are you trying to choose a particular design aesthetic from several options? Are you trying to validate that a particular part functions properly on its own? Are you trying to test the fit between several components, or perhaps the function of an entire assembly of many components?
The answers to the questions above have a profound impact on the number of prototypes you should make during a particular round of prototyping and what prototyping method you should use. I’m not going to go over each scenario in detail because there are too many to count, but the key here is to ask yourself what you want to learn or accomplish using the prototype/s and choose your prototyping strategy to match.
Tip #3: Use Scaling to Your Advantage
If the goal of the prototype is to choose a particular design aesthetic from several options, consider prototyping the part at the smallest scale that is still useful. This will speed up the machining or 3D printing time and will decrease the cost of the prototype itself. Half scale is a great place to start. In case you didn’t know, ½ scale results in ⅛ the material and volume (½ width x ½ length x ½ height = ⅛ total).

Tip #4: Symmetry is Your Friend
If your part or product is symmetric about a certain plane, consider using a single prototype to show two design options. This requires some skill, to visualize each half as though it were a whole, but it cuts your prototyping time and cost in half for each option. An alternative way to look at this is that you get twice as many options for the same prototyping time and cost.

Tip #5: Think of Each Prototype as an Experiment
Most people design a product, and when they think the design is “ready,” they have a prototype made. It’s important to note that a given design is actually a combination of many variables—if you aren’t sure what I mean by variables, I urge you to consider every dimension you used in your design as its own variable. All together, they make up your design.

When you prototype revision 01 of your part or product, what you’re really doing is testing whether the current combination of variables works or doesn’t work. Due to the fact that there are a lot of variables in your design, and you’re just testing whether the combination works or doesn’t work, you’re likely setting yourself up for failure. Chances are high that the combination will not meet ALL of your requirements—worse yet, it may not be obvious which variables/dimensions need to be adjusted or by how much.
You have to make your best guess at adjusting those variables/dimensions, before you can make another prototype and see if that revision completely solves your problem or not. Odds are that the changes get you closer to your goal, but still don’t completely solve your problem.
There’s a reason that most people do use this approach, and it’s a very human one: I believe it’s primarily due to a desire for instant success and validation. After all, if your prototype happens to work perfectly, you’re done! No need for any more work whatsoever! That’s pretty appealing, but the problem is that the prototype almost never works perfectly, so why not plan accordingly?
Tip #6: Test Variables Individually (After all, You Can Prototype a Feature without Prototyping the Entire Part)
If we agree that a particular design is composed of many variables, then why not prove out certain high importance variables early on? You don’t need to wait until all of your variables are put together into a cohesive design before you test them.
If you’re in the process of designing a new water bottle and cap, you could certainly prototype revision 01 of the bottle and the cap once you have your new design aesthetic completely dialed in. If a feature such as the threads is new, however, I recommend prototyping a simplified cap and only the top portion of the bottle early on, to see if the threads fit as intended. If things don’t fit properly, you can make those adjustments early on and test out those adjustments once the aesthetics are finalized.

Tip #7: Test Multiple Choices for Certain Variables at Once by Making Several Prototypes at the Same Time
Let’s say you’re following tip #6 and about to prototype a simplified cap and only the top portion of the bottle, so you can test out the threads. You aren’t sure if the major diameter of the cap’s internal threads should be 59.5mm, 60.0mm, or 60.5mm for a perfect fit. Your best guess is 60.0mm, but you aren’t sure.
Rather than choosing to prototype that feature using 60.0mm, make three different prototypes! That way, you’ll know instantly which dimension works. If none of them happen to work adequately, you’ll know which size/s to prototype next, and you’ll have strong reasoning for it.

Tip #8: Plan for Handwork
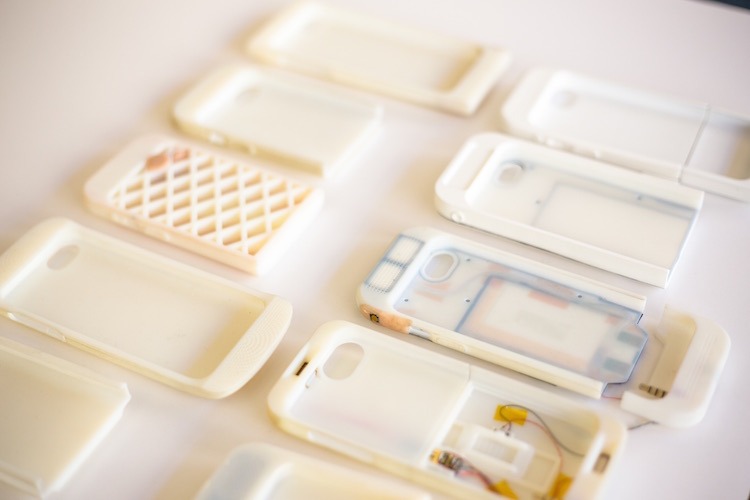
We live in an age in which much of the design process is digital, but there are times when getting your hands dirty is much faster than spending a whole lot of time making CAD changes and then waiting for another prototype. It’s quite common these days to 3D print parts as “hollow,” meaning that the center of the 3D print is really a honeycomb structure, instead of a solid mass. This is common because it saves material and speeds up the 3D print job.
Both benefits combine to yield you a cheaper 3D print, but if you need to modify that 3D print by hand, you’ll quickly break through the outer wall of the print and find yourself in trouble. You’ll likely need to fill the void with bondo or some other material before you can get back to where you left off. All in all, the situation isn’t a fun one in which to find yourself.
If you’re a handy person and expect to hand modify your prototype, I recommend either:
- 3D printing your parts as “solid,” so hand modifications are a breeze. Then, you can take a few measurements of your modifications and apply them to your CAD model before making another prototype. Warning: this will drive the cost of each 3D print way up!
- CNC your prototype, instead of 3D printing it. CNC prototypes are solid by nature of starting from a solid block of material, so handwork is just as easy and straightforward as on a solid 3D print. Just keep in mind that some geometry that’s achievable via 3D printing can’t be achieved via CNC machining services. If your part uses has undercuts, for example, CNC machining might be completely out of the question.
Main Takeaways
As mentioned before, product design and development is an iterative process. You design, you prototype, and then you evaluate your prototype, so you can change your design and start the cycle all over again. Reducing the number of design iterations is the key to getting to market quicker and saving money along the way. To reduce the number of design iterations your product needs, use the eight tips described in this article to strategically plan your prototypes.