Our latest teardown focuses on the popular action camera GoPro. This teardown is actually not a singular adventure, but an odyssey of epic proportions, split into 2 parts. We’ll look at the product’s evolution across three generations and see how the engineering and manufacturing techniques have changed in the last half decade.


To begin this ancestral analysis, we’ll journey back in time to 2010, to the release of the first HD Hero camera.
HD Hero
Removing the back cover of the HD Hero is straightforward and reveals the removable battery, which is clearly labeled as 3.7V 1100mAh Li-ion.

Once the rear half of the housing is open, the first board is visible, as is the device’s microphone and buzzer speaker.

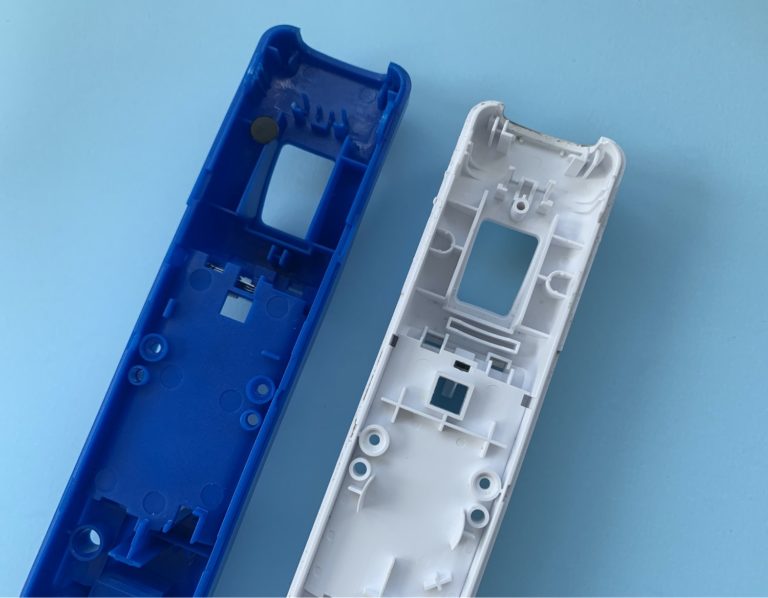
We can also see “ABS” embossed on the injection molded case half—a clue to the plastic used to manufacture this enclosure. This is odd, however, considering the back cover of the device was embossed with “PC-ABS” (a blend), and online resources tell us the body is made of polycarbonate (PC). Since PC is more expensive than ABS, it was probably avoided on certain pieces to cut costs.
This side of the rear board isn’t the most exciting thing. It has a bunch of resistors in the center for the processor and a large chip that is likely for the SD card and USB port.

Upon closer inspection, we see there’s a bit more happening on the back side of the first board. In the center lies the brains of the GoPro—an Ambarella processor. It’s covered in thermal paste.

To its right is the CMOS image sensor, responsible for converting your hardcore (ahem: embarrassing) sports activities into digital signals for storage on the SD card. Hanging off the left of the board is a buzzer—a cheap alternative to using a speaker when quality is not a concern and only basic tones will be output.
Taking a closer look at the housing, we can tell it’s been painted because of the color difference in the two sides. Though this adds an extra manufacturing step and is not cheaper than in-mold coloring, it will help ensure color consistency if the materials are different. It’s also how you get soft touch plastics.

From the inside (right picture), we can see a few more notable DFA features: The LED cover has been heat staked in place, and so has the power button. There are also ribs around the LCD window to help position the screen component during assembly.
With the housing completely removed, we can see the front board easily.

The device’s LCD screen is held on by a folded ribbon cable, and the f/2.8 glass lens sits to its right. Below the LCD, there’s a bulky tactile switch—the camera’s front “mode” button. Screws above and below the lens, as well as one near the LCD, hold the front and middle boards together.

One last look at the flipside of this subassembly before we separate it. Try looking at tiny objects through the lens! Try NOT to touch the paste on the metal heat spreader—the stuff gets everywhere.
On the back of this newly freed board, we finally gain access to the SD card slot, as well as the USB and audio ports.

Here’s one more look at the front board with the lens removed. The LCD has also been pulled aside, so the ribbon cable design is visible. The extra length of this cable could mean that the LCD is an off-the-shelf component and not optimized for the GoPro.

The HD Hero also has a waterproof case available as an accessory. The two buttons on it used to actuate the shutter and mode buttons on the GoPro itself are an interesting little subassembly, so I tore them apart, as well, to see how they keep water out.

Removing the retaining ring from the groove at the bottom of the button allows it to be quickly removed from the case, and from there, the assembly comes apart pretty easily. Not bad that two O-rings and a plastic gasket can provide a dynamic, yet functional seal! However, if you read Fictiv’s Apple Watch teardown, you probably remember how much less bulky that waterproof button design was.
And with that, the first of our GoPros is kaput. On to the next!
Hero3
I thought I’d start this second autopsy the same way I started the first—by removing the back cover (black molded plastic this time—no longer painted) and the battery, but the folks at GoPro had me fooled, and there were no screws back here.

It did reveal that the battery is 3.7V and 1050mAh, however.

This is a 4.5% decrease from the HD Hero, probably because this newer version is quite a bit smaller. Using default recording settings, the HD Hero gets about 2.5 hours of recording time on a single charge, while the Hero3 only lasts 1.5 hours—a 40% decrease! Of course, the Hero3 records at a much higher resolution by default, so this shows us battery life is dependent on more than just the battery capacity.

Moving back to the front of the device, there is a thin plastic cover that can be pried off with a flat screwdriver or something similar; it is aligned with a few tabs and secured with snap-fits.

The inside of this injection molded cover looks fairly similar to the first GoPro, still using heat stakes for assembly in places, albeit with slightly improved design to the LED cover and button integration. This assembly is much lower profile than in the HD Hero.

Underneath the cover is a low-profile dome switch—gone is the boxy tactile switch of the HD Hero. There are also the exposed LCD and lens, and our key to going deeper into the device—four T4 Torx screws.

After removing the four screws, the device opens up pretty easily. Only a ribbon cable holds the electronics subassembly to the rear portion of the device and case, so that can be separated for easier viewing.

On the back of the electronics package several things are viewable: an expansion port, a heat spreader, smaller ICs+Bluetooth, and a QR code, used for tracking and tracing of inventory.

At this point, the LCD screen on the front has almost fallen off the package. It’s attached to the flex circuit (FPC) with the dome switch, which peels off the rigid board behind it with ease. Use of these FPCs with their miniaturized electronics saves a ton of space over having a rigid PCBA and considerably simplifies assembly.

Well, what do you know? On the underside of the heat spreader actually lies the CMOS image sensor. The one on the Hero3 looks essentially the same as the one on the HD Hero, but we know that in this case, it has over double the megapixel capabilities and supports 4K video!

The sensor and its heat spreader are easy to remove, too. This kind of modular design lends itself well to easy repair and replacement, as well as rework in the factory, should a component be faulty.

The next board to remove contains the expansion port and the device’s microSD slot. The cable connecting it to the motherboard also pops off with ease.

A few more Phillips screws, and the motherboard separates from the rest of this subassembly. We’ve already seen this view, so let’s flip everything over.

Finally, the main chips can be seen. Like its predecessor, the Hero3 is run by an Ambarella processor. Next to that are a flash/SDRAM chip, a power management unit (PMU), and the USB controller. Unlike the first teardown, where chips spanned multiple boards, here, everything is densely packed—another example of continued electronics miniaturization. Thermal management is crucial in arrangements like this.

Three more screws and the lens comes free. Glass, f/2.8, and aspherical, just like before.
On the back half of the housing, most components are gone now, but a metal panel remains, as does the slide mechanism that opened the battery cover.

It operates using two screws in slots and a torsional spring—simple to the point of being pretty clever!


Three little molded light pipes are in the housing back as well—pretty cool geometries. The old GoPros never used to have indicator lights on the back, making it difficult to see whether the camera was recording or not.

The metal panel that shields the camera’s guts from the battery is held in with snaps and pops out with a little effort…the final piece of this puzzle, besides a few lingering light pipes!

Overall, the Hero3 was much easier to disassemble than its predecessor. Everything was done with Torx and Phillips screwdrivers, plus a little prying. The modular assembly is a big step up in terms of repairability, and in general just feels and looks sleeker and more “designed”.
Two down, one to go! Subscribe here to get part 2 of this series in your inbox, where we’ll teardown the latest GoPro Session and see how it stacks up against these first two generations.