For this teardown, we were joined by long-time Fictiv partners Harald Quintus-Bosz, CTO at Cooper Perkins, and Ann Torres, VP of Engineering and Operations at Cooper Perkins. Both Harald and Ann provided us with lots of insight into the design and manufacturing processes behind the Dyson Cool bladeless fan.
The Dyson Cool uses the Coanda effect, or an air inducement and entrainment, to create an air flow that is smoother than traditional bladed fans. While costing approximately $299, the retail price for this fan technology is approximately ten times the price of a typical fan. The reasons for the price difference can partially be seen in the details of the teardown, where clever design, high quality parts, and intricate molds are seen everywhere in the assembly.
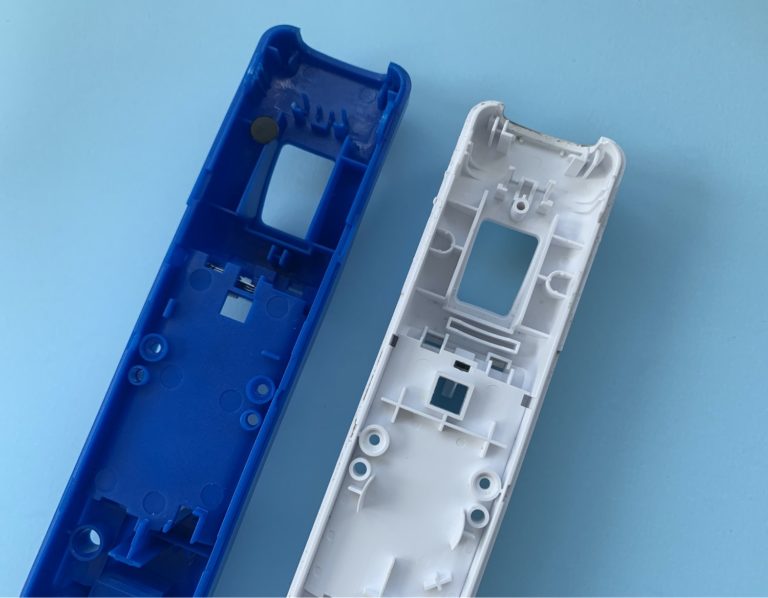
Here are the features of interest we’re drilling into for this teardown:
1. Fan Outer Housing – an extremely complex injection molded part that delivers polished and reveal-free surfaces on the outside, with numerous functional features on the inside
2. Air Flow Design – at the center of the air flow path is the impeller, which is designed for maximum performance and quiet operation
3. Design for Assembly – cleverly designed features were implemented to ensure ease of assembly and a clean exterior with no exposed hardware
4. Cost Analysis – the cost of goods is far more than the typical fan, so we’re going to dig into what factors may have contributed to the price point for Dyson. To go deeper on this subject, Cooper Perkins CTO Harald Quintus-Bosz will host a webinar on Designing for Scale on Friday, October 19th, based on a course he teaches at MIT. To learn more and register, visit the webinar page.


Fan Outer Housing


Air Flow Design

The key to understanding how the air flows through the Dyson Cool lies in the pedestal stand of the fan, where the blades are located. To learn how the air flows through all the parts in the stand, we began by taking apart the top of the pedestal.

The first two pieces we removed were the upper plenum air guide (left) and the aerodynamic diffuser (right). The aerodynamic diffuser is a crucial piece, as it separates the air that is being pushed up towards it (from the impeller that is housed below) into controlled parts of air. The aerodynamic diffuser and outer upper plenum air guide are both made out of glass filled polypropylene.

Next, we removed the impeller/motor mount from the pedestal. The motor is mounted to this part facing the top of the pedestal stand, while the impeller is attached on the other side, on the bottom of the pedestal stand.

The impeller is another complicated part. It has nine asymmetric blades that are scalloped on the output edge, in order to soften the pressure differential and create smooth airflow. There is evidence in two places that the impeller is dynamically balanced to prevent it from vibrating when the fan is running.

Unlike in earlier models, where the impeller was post-machined for signal tuning purposes, this impeller has features that soften the airflow at the trailing edge and consequently reduce noise levels.

The impeller is housed inside this volute to further capture and dissipate the motor noise. It is also engineered to dampen vibrations caused by the motor.
Design for Assembly

While taking this fan apart, we came across a number of smart design features that were implemented for the purpose of design for assembly. One of these features was the locking mechanism used to constrain the tilt plate’s position. The locking part mates to the top face of the pedestal base through the use of a snap fit. A very small snap head is designed, yet it does a fantastic job of keeping the tilt plate in place.

The upper plenum air guide and the outer perimeter piece incorporated poke yoke in their designs, so they could only be assembled in one way. Neither of the bosses on either part lines up with each other, unless they are both assembled in the right orientation with respect to one another.
Cost Analysis
The Dyson fan is approximately 10 times as expensive as a common fan, but it fundamentally does the same job. What may be some of the reasons for the high costs? The Dyson fan is positioned as a high-performance and high-quality fan with beautiful aesthetics. This means that goals for quality materials, hidden fasteners, minimal parting lines on the outside of the product, low noise and long life resulted in more costly materials, processes, and components. The positioning of the Dyson fan allows Dyson to charge a premium, but this estimation also shows that it there is also a significant cost premium to offer that level of quality.
Main Takeaways
Tearing down the Dyson Cool illuminated just how much engineering has gone into designing this “magical” fan. While the fan is sleek and elegant from its exterior, it houses several intricately designed parts that work together to create a constant cool breeze.
With a number of complicated parts, from the fan housing to the impeller, the production of the fan’s parts calls for advanced plastic injection molding processes. In addition, this product was designed with the intention of an easy assembly process, resulting in several clever mechanisms.
What really sets this fan apart is the technology behind this “bladeless” fan. Dyson engineers have applied the fundamental laws of inducement and entrainment to develop a technology that is both simple and brilliant.